
There are many different methods of fabricating McKibben actuators, depending on the desired specifications and intended application. However, the general fabrication process is as follows:
- Get inner tubing (can be off-the-shelf or custom-molded) and cut to length
- Cut mesh to length and seal one end
- Optional: Modify end braid angles (helps prevent ends from fraying)
- Pull mesh over inner tubing
- Add air line and seal/clamp
- Optional: Coat actuator with outer layer of elastomer (for faster deflation)
Example Fabrication
The actuator made in the below guide can be made in under 10 minutes using entirely off-the-shelf parts. Though this is one specific fabrication process, it demonstrates the more general process outlined above.
Materials

-
Party balloon (long thin kind used for making balloon animals)
- This will be used for the inner bladder, other types of elastic tubing would work also
- Braided mesh sleeving
- Barbed connector (use one that fits your pressurized air source for easy attachment later)
- Zip tie
- Lighter
- Nut, washer, or similar tool with a hole diameter smaller than the braided mesh
Assembly

|
Cut a piece of mesh 4-5 inches long. Cut a piece of party balloon about the same size. |

|
Gather the strands of one end of the mesh and hold them together with a tool, leaving 3-4 mm sticking out the end. Several tools can be used, i.e. pliers, a metal fixture, etc. Here we use a nut. |
|
|
Hold a flame very close until the strands melt and fuse into one clump. |

|
|
Remove the nut. The end should not fray even when the mesh is compressed. |

|
|
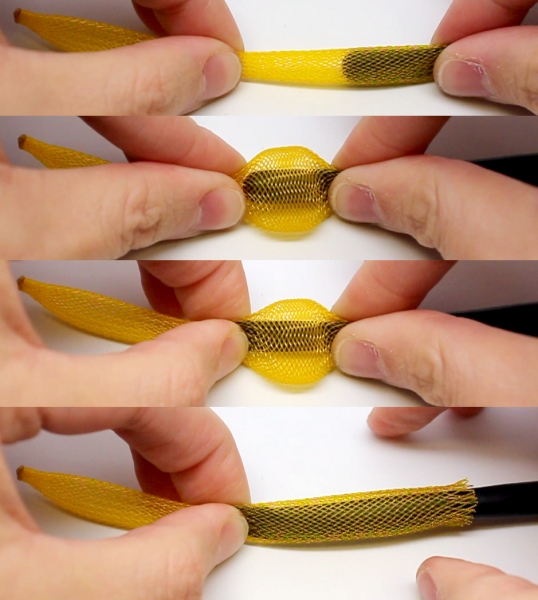
Put the balloon in the mesh. Insert the balloon 1-2 cm without fraying the mesh too much, then use the following “inchworming” process [Video]:
|

|
Trim away any frayed mesh and trim the balloon to match the mesh length. |
 
|
Insert the barbed connector, with the larger end going into the balloon. Use the zip-tie to secure the mesh and balloon onto the barbed connector, clamping onto the narrow section immediately after the barb. |
Actuation

|
Trim the excess zip tie ends, then connect the actuator to a pressurized air source like a hand pump or wall valve. |
 
|
Pressurize the actuator. It should contract about 25% of its original length. Be careful not to over-inflate as it may pop. If your actuator leaks, you can re-do the zip-tie clamping after adding some padding around the barbed connector, or use thread wrapping instead of the zip-tie. |