Food for Thought - Edible Actuators
An Exploration into Soft Robotic 'Candy' Actuators
One of the goals of soft robotics is the ability to interface with the human body. Traditionally, silicone materials have dominated the field of soft robotics. In order to shift to materials that are more compatible with the body, developments will have to be made into biodegradable and biocompatible soft robotics. Our Soft Robotics Team decided to try and develop gummy actuators which are biodegradable, edible, and tasty. We believe that creating biodegradable and edible actuators can be both sold as an interactive candy product for children and also inform the design of implantable soft robotic devices.
|
|
We were inspired to make these gummy actuators because while eating a gummy worm during one of our planning sessions, one of our members mentioned how cool it would be to have a gummy worm wiggle around like an actual worm. In order to develop these gummy actuators, we first researched gelatin, a prominent ingredient in gummies. Our project is the culmination of two unique categories: children’s candy and robot design. Our goal was to build soft robotic actuators out of melted gummies. We define success as being able to create an actuator that was delicious and have it able to complete three actuations. We imagine a child buying this candy, playing with it for a few minutes then eating it. Throughout this process we explored the creative process with mold synthesis and formulating different chemical compositions of gummy material. We have documented our steps within the categories of Design, Fabrication, and Testing on our path to creating our final products.
We preceded to
1. Conduct both quantitative and qualitative analysis of gummy candy material.
2. Melt gummy candies and mold them into soft robotic shapes.
3. Create our own candy robot formula: The Fordmula. The name Fordmula comes from the fact that it is a formula coming out of HaverFORD.
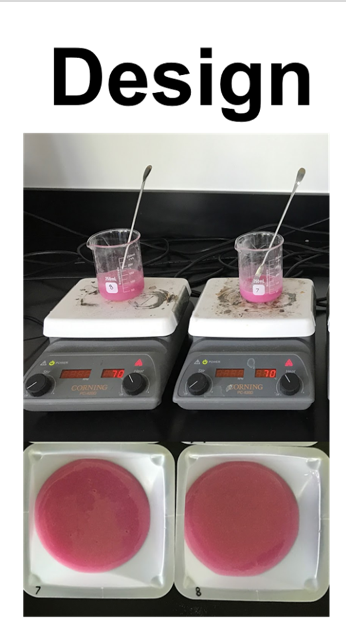
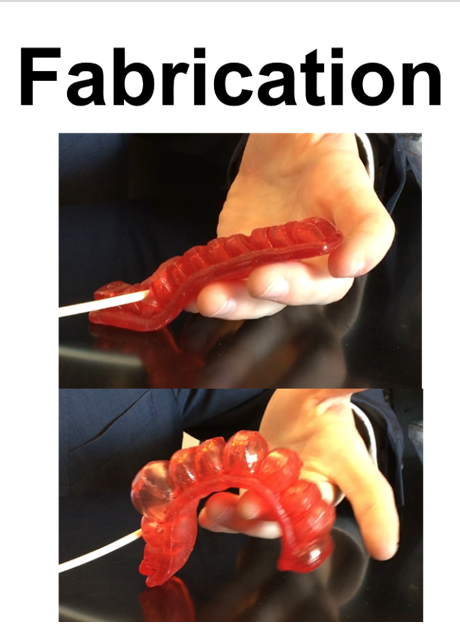
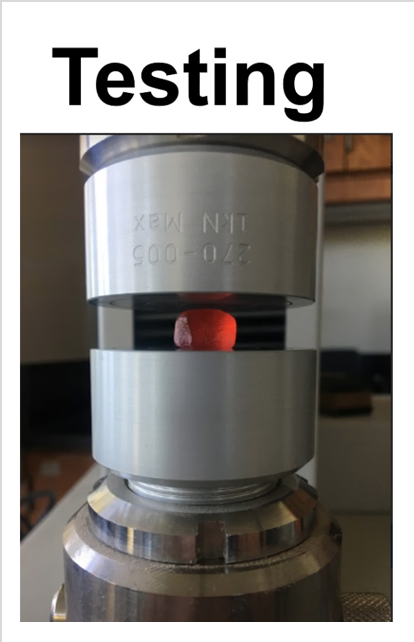
| Figure 1: The Three Stages | ||
|
|
|
| These are the three stages of our product. First, we made our design. Then, we fabricated the actuator. After, we tested the material. | ||
We aim to revolutionize the, often mundane, elementary school science class by providing an early introduction into the world of Soft Robotics and pneumatic control. In addition to the the classroom there could be a need for gummy bear toys to aid in the delivery of medicines and vaccines. These gummy toys could be made with the vaccine or the vitamin in it. The need for tasty gummy actuators could be used in oral surgery as a pleasant way of reaching in a child's mouth. While our project is focused on the educational and entertaining aspects of the gummy and gelatin actuators there could be a broader need for edible and good tasting actuators. While working on this project, we read a recently published paper (Shintake et al. 2017), and thought that we could have even more improvements to the tastiness and edibility of soft robots.
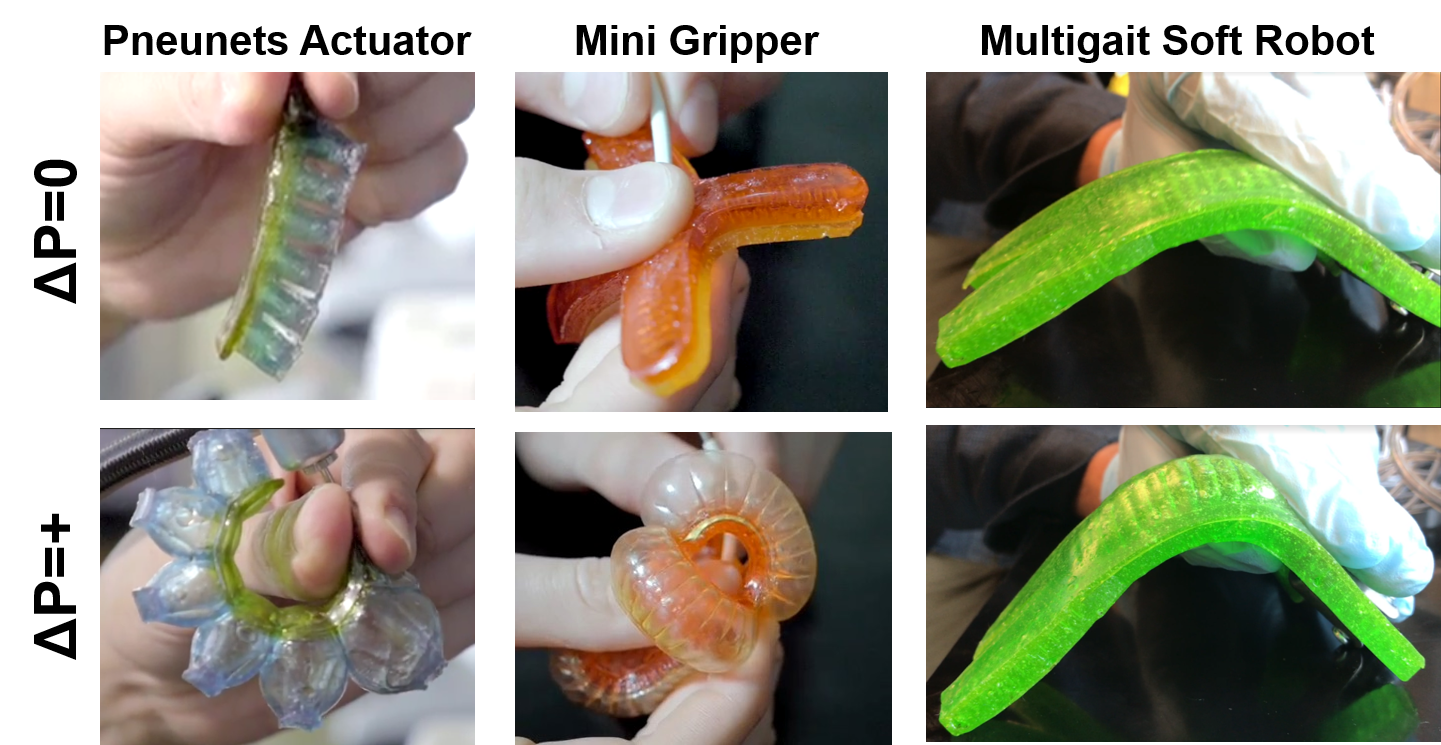
| Figure 2: Pressurizing the Actuators |
|
| Shown above is the juxtaposition of three different actuators depressurized and pressurized. |
Design
Gummy Bear Actuators
1. Inflating Worms Experiment - Proof of Concept
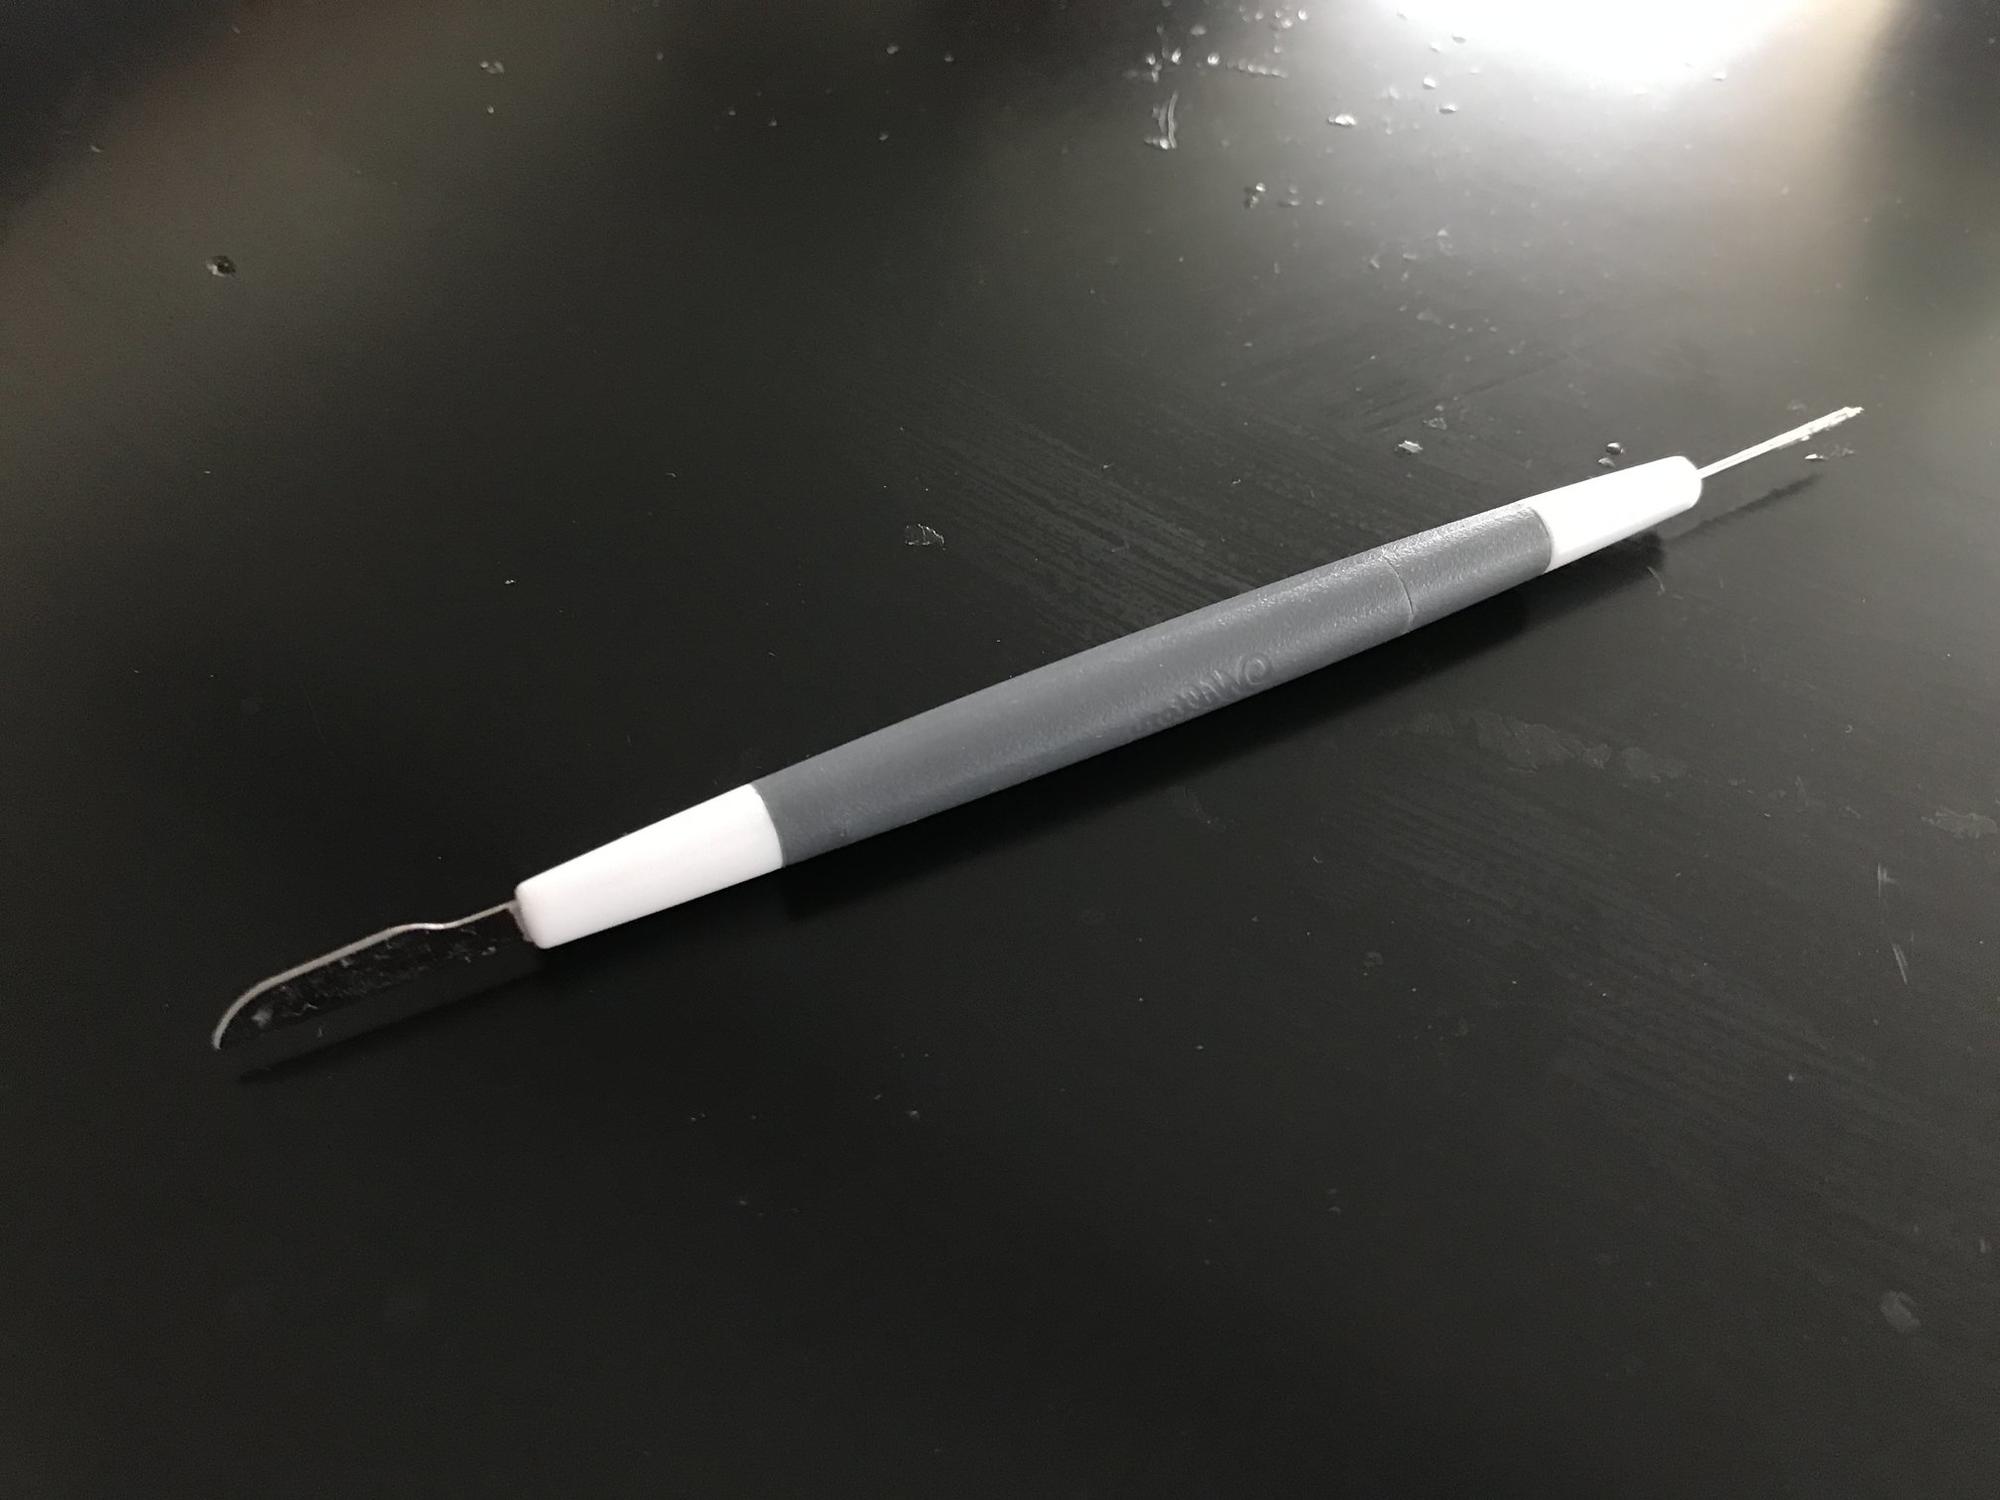
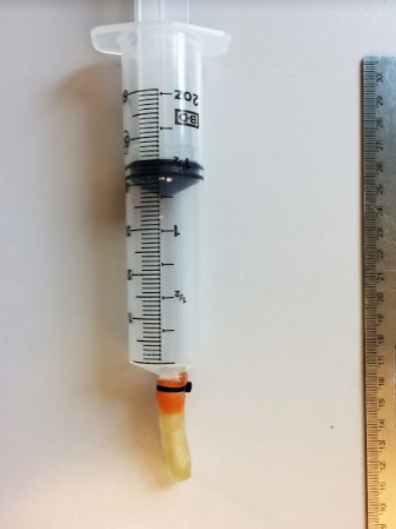
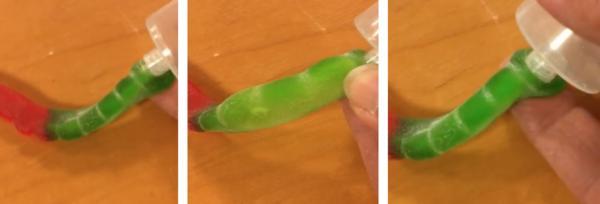
We first asked if gummy candies on the market were both stiff enough to withstand high pressures to inflate and elastic enough to return to its original shape after actuation. To test this, we bought gummy worms from a local grocery store. We used a Wilton brand Cookie Flooding etching tool to bore a hole through the gummy worm. We ran into an issue when the gummy worm would meld back together as soon as the etching tool was removed. To counteract the self healing properties of the gummy, we covered our etching tool in flour to dry out the inside of the worm. We then attached a syringe and successfully inflated and deflated the worm. After this experiment, we were confident that gummy candy can be used for soft robotic actuation.
| Figure 3 and 4: Tool and Gummy Worm on Syringe | |
|
|
|
The image above on the left is the tool which we used to poke a holes into the gummy worms as well as to help us carefully remove melted gummy bears from the actuator mold. The image above on the right is an image of a gummy worm on a syringe. |
|
| Figure 5-7: Inflation of Gummy Worm |
|
| The figures above show an inflation cycle of a gummy worm |
2. Recasting of gummy candy
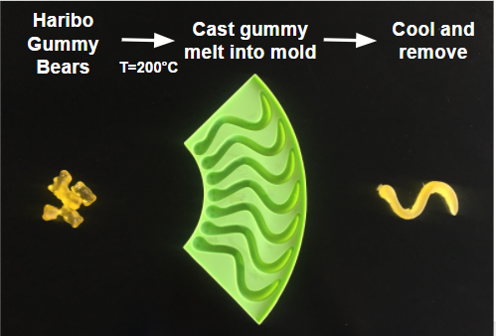
Once we determined that gummy candies could be inflated, we asked if we could melt down gummy bears to re-shape them as actuators. To start, we melted gummy bears in glass beakers on a hot plate heated to 200deg C. We used candy molds to cast melted bears as worms.
| Figure 8: Sequence of Bears to Worms |
|
|
The figure above shows the process of melting gummy bears, pouring the solution into the mold, then cooling to make gummy worms. |
3. Molding candy actuators.
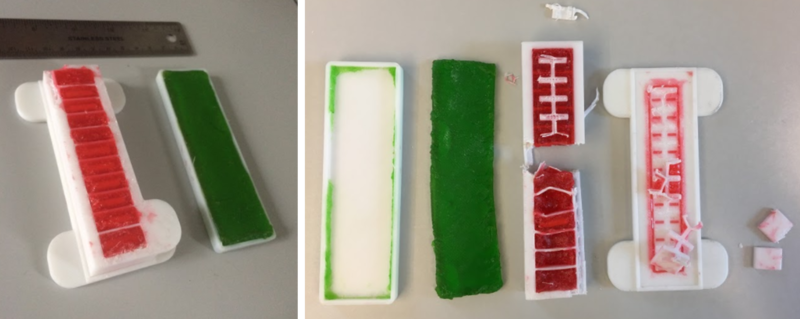
We then followed this procedure to cast gummy bears as actuators. Using a 3D-printed mold, we created a pneunet actuator. We immediately ran into two issues: the high viscosity of the solution made it difficult to pour - and, after curing, the candies adhered to the mold, breaking the molds upon removal.
|
Figure 9-10: Gummy Actuators |
|
The figures above show the first molds to be filled with melted gummy bears.
To remedy these two issues, we began using a 60ml syringe to fill the molds and started spraying the molds with Pam cooking spray. Using a syringe allowed for a smoother and more even flow of the gummy candy. Adding the Pam cooking spray allowed for the gummy to be molded but not adhere to the mold allowing us to remove the gummy in one piece.
| Figures 11-17: |

|
|
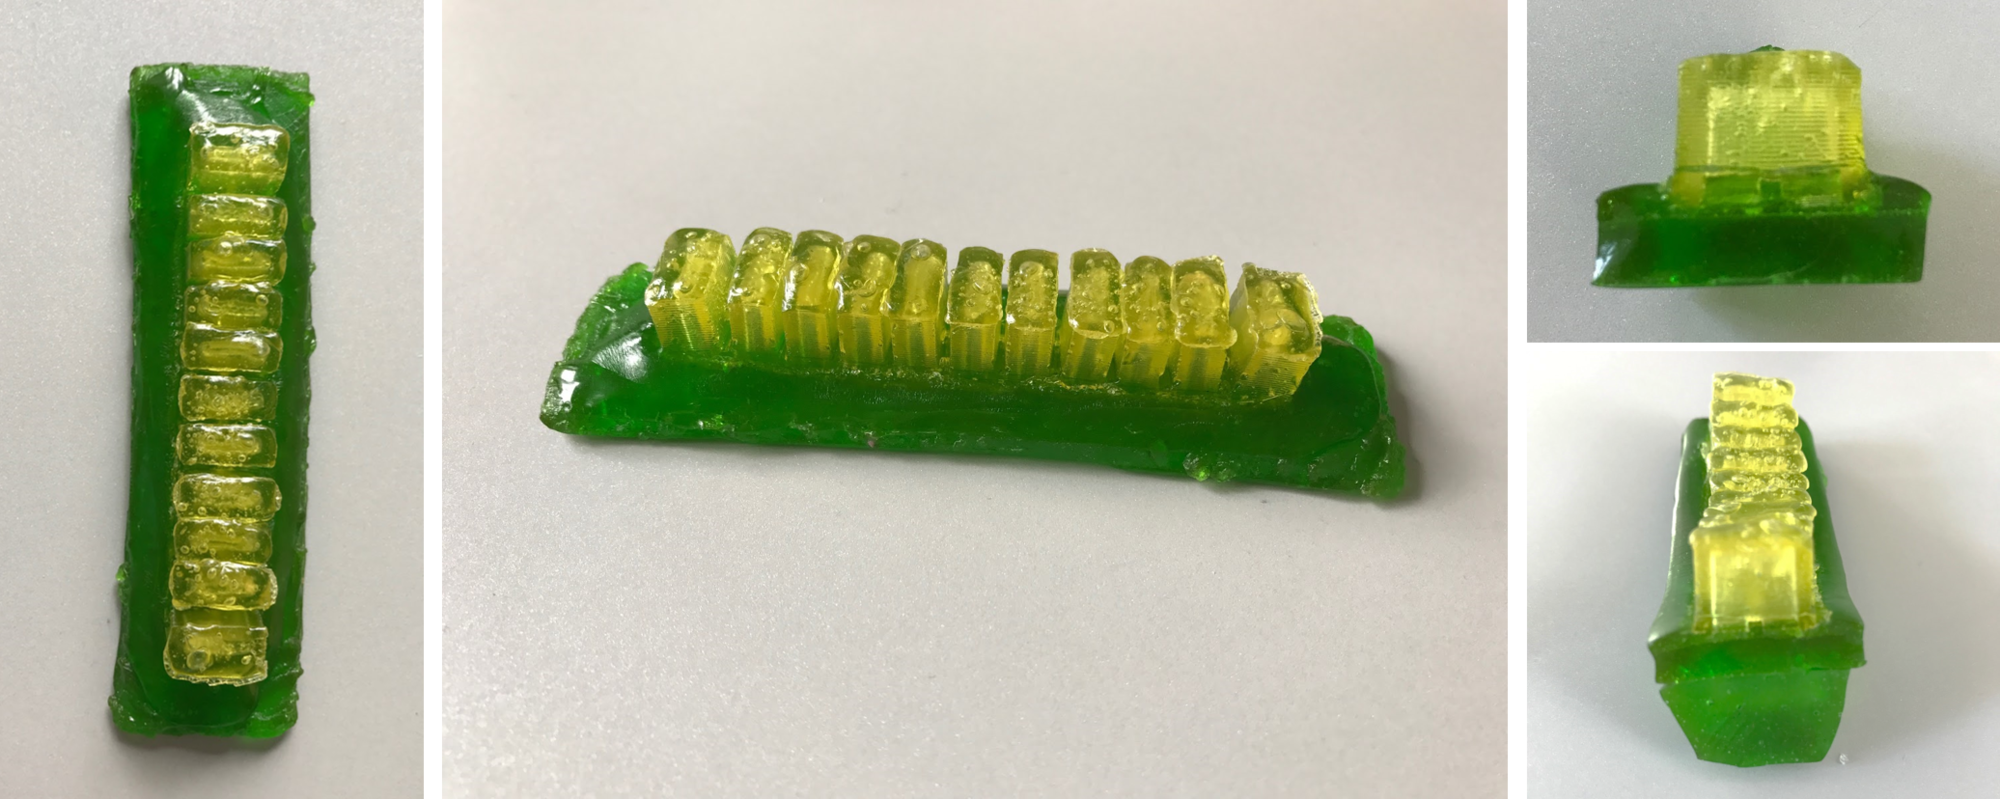
The images above show the process of melting, pouring, and assembling the candy actuators. In the second picture the green gummy is the bottom layer and the yellow gummy is the top layer. They are eventually glued together to create the whole gummy actuator.
We did a series of compression and qualitative testing on the gummy bears which can be seen on the Testing page. We noticed that it took around three days for the melted gummy bears to rebond the broken gelatin long chain structure and return to having similar properties to that of the gummy bears directly out of the package. Upon adding desiccant we noticed a drop from three days to a single day which allowed for a quicker production of actuators.
Initially when we were tasked with attaching the base of the actuator to the air cavities we simply melted gummy bears and used that as a form of glue. This process was tedious as the "glue" could get into and clog some of the air pockets and took quite a bit of time to dry. Addressing this issue, we switched to water. We wet the base of the actuator and stuck the top part of it directly on. the water bonded the two halves together and was a better gluing agent for the gummy bear actuators.
The Fordmula
4. Identifying Issues
We were excited with the results of our gummy bear actuator, but we saw some areas to improve. To put it simply, the gummy bear solution did not perform at the high level required for quick and easy production as well as rigorous actuation. The solution had low elasticity and would not come back to its original shape very quickly. When actuated, it would remain stretched out for long periods of time. Another issue was the long curing process to make each actuator. Once the gummy bears were poured into the mold, we had to wait days before they became semi-stale and had any elasticity. This process was made even longer when you factor in the waiting period of attaching the bottom layer to the top layer - a long wetting and melting process.
With our own "Fordmulation," we aimed to increase elasticity - and decrease production time. We set out to make our own optimized formulation — The Fordmula.
Looking at the common ingredients of candies resembling our desired properties (Gummy Bears, Laffy Taffy and Jello), we designed an experiment which would help determine the ideal formulation. The four key ingredients were gelatin, corn syrup, water and flavoring. According to our detailed qualitative analysis the flavoring and the sugar had a negligible effect on the actuators. The qualitative analysis included cutting the gummy material with a knife to mimic our teeth and stretching the gummy material to look at how easy or hard it was to stretch (malleability) and its elasticity. After we had narrowed down possible ratios, from qualitative analysis, we added the flavoring back into our tests to get a more accurate result.
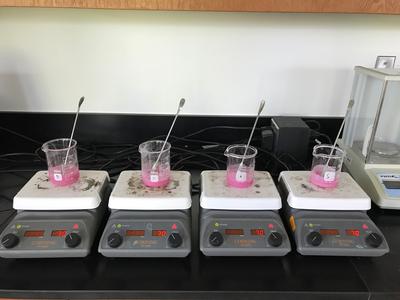
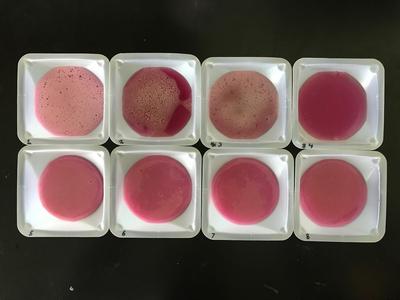
We first tested the ratio of solvent to solute. The solvent (equal parts corn syrup and water) was mixed in a 1:1 ratio to form a well mixed solution. To that we added a constant amount of gelatin to varying volumes of the water and corn syrup solution. These solutions were then heated up to 150° Celsius to concentrate the solution by evaporating the water.
| Figure 18 and 19: Solvent to Solute Ratios | |
|
|
| The figures above show the creation of different samples. | |
| Table One: Tested Ratios of Solvent to Solute |

|
| This table shows the different types of solvent to solute ratios and the qualitative analysis of each tested solution. Solution 1 to 4 varied from 0.36g gelatin/mL liquid to 0.12g gelatin/mL liquid. |
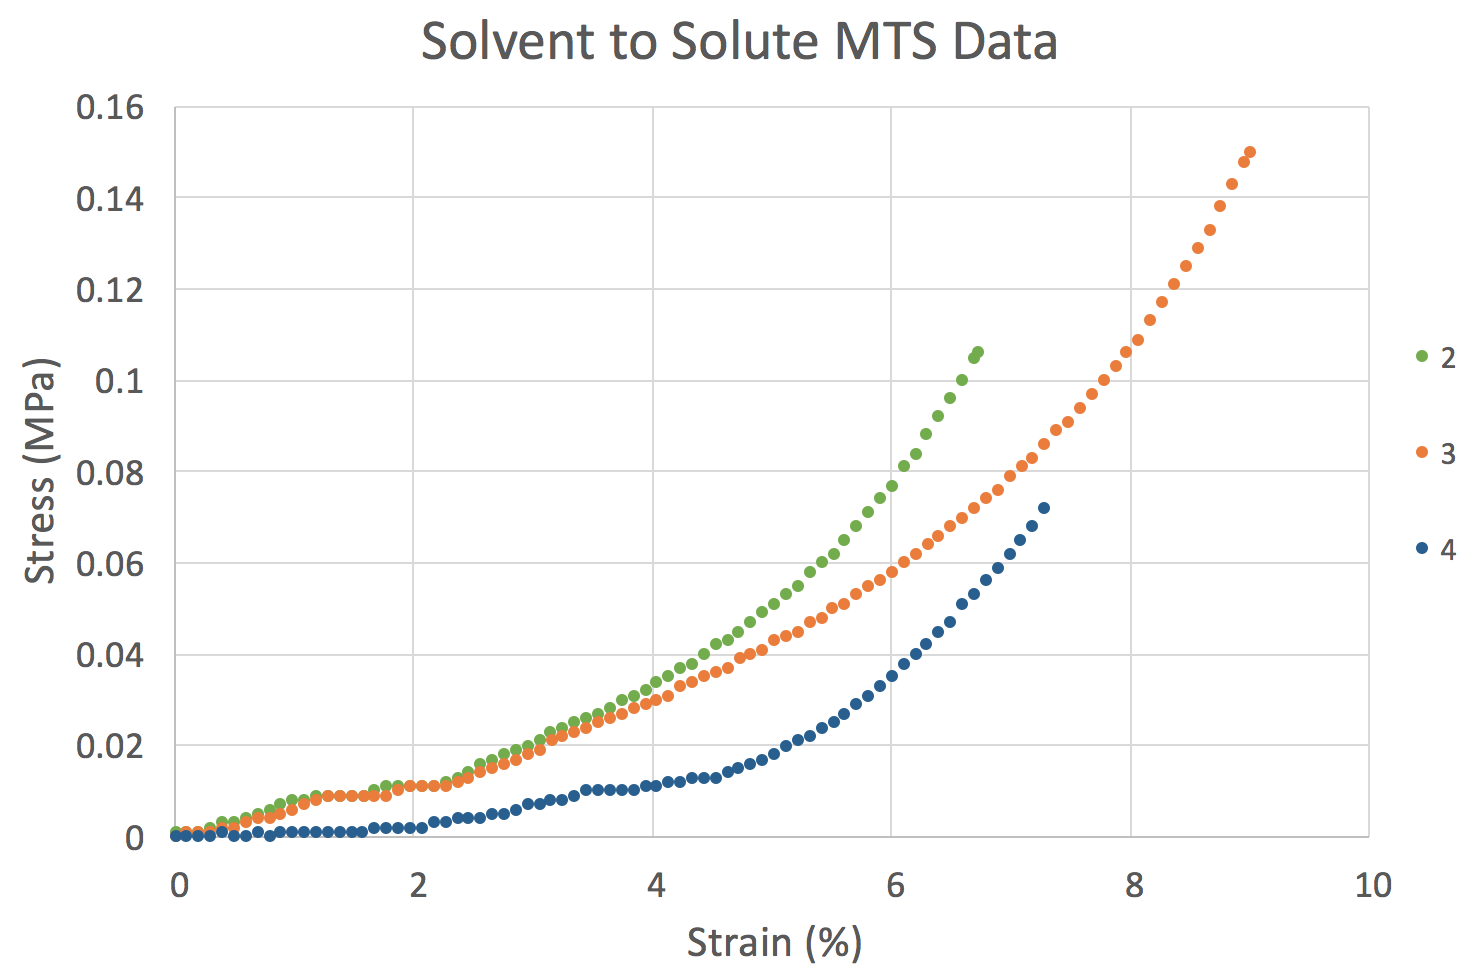
| Figure 20: Mechanical Testing System Data on Solvent to Solute Ratios |
|
Figure 20 displays the graph of Strain vs. Stress for Solvent to Solute calculated by MTS Testing.
We used an MTS to analyze which ratios would have the most ideal properties to perform rigorous actuation. Solution One was not tested as its globby and uneven properties proved it to be un-testable. Solution Two was the most stiff but was much too viscous to properly pour into the mold. Solution Four was the least elastic. Solution Three appeared to have the optimal viscosity and elasticity and was chosen as our path forward. Upon having the optimal solvent to solute ratio we could now test the different ratio of solvents.
Using Solution Three at a ratio of 0.18g gelatin/mL, next we varied the ratio of corn syrup to water to optimize the formulation further. The control was the one to one (Corn Syrup to Water) ratio previously tested. Four additional solutions of varying solvent ratios were prepared.
| Table Two: Tested Ratios of Corn Syrup to Water |

|
| This table shows the different solvent to solvent ratios. |
Upon visual observation, the mixtures appeared to have varying degrees of clarity. With increasing dilution of the corn syrup, the solutions became clearer and less viscous.
| Figure 21: MTS Data on Solvent to Solvent Ratios |
|
|
| Figure 21 displays the graph of Strain vs. Stress for Solvent to Solvent calculated by MTS Testing. |
Solution 3.2 was chosen for several reasons. First, it had the steepest strain vs. stress curve which proved to produce the stiffest material able to withstand actuation pressures. This is important for actuation so we know the actuator will quickly come back to its original shape and perform many actuations. The solution was also clear, a visually appealing candy, in contrast to the more murky solutions with higher corn syrup concentrations. Lastly, the solution wasn't too stiff that it would be impossible to chew. It has a great balance of easy tearing contrasted with high tensile strength and elasticity.
We also filed a provisional patent on the Fordmula. We are all co-inventors on the provisional patent, US Patent Application Number 62/517,299, entitled “EDIBLE PNEUMATIC SOFT ROBOTIC ACTUATORS”, filed on June 9, 2017 by the Haverford School.
Some areas of future enhancement are descrbed here
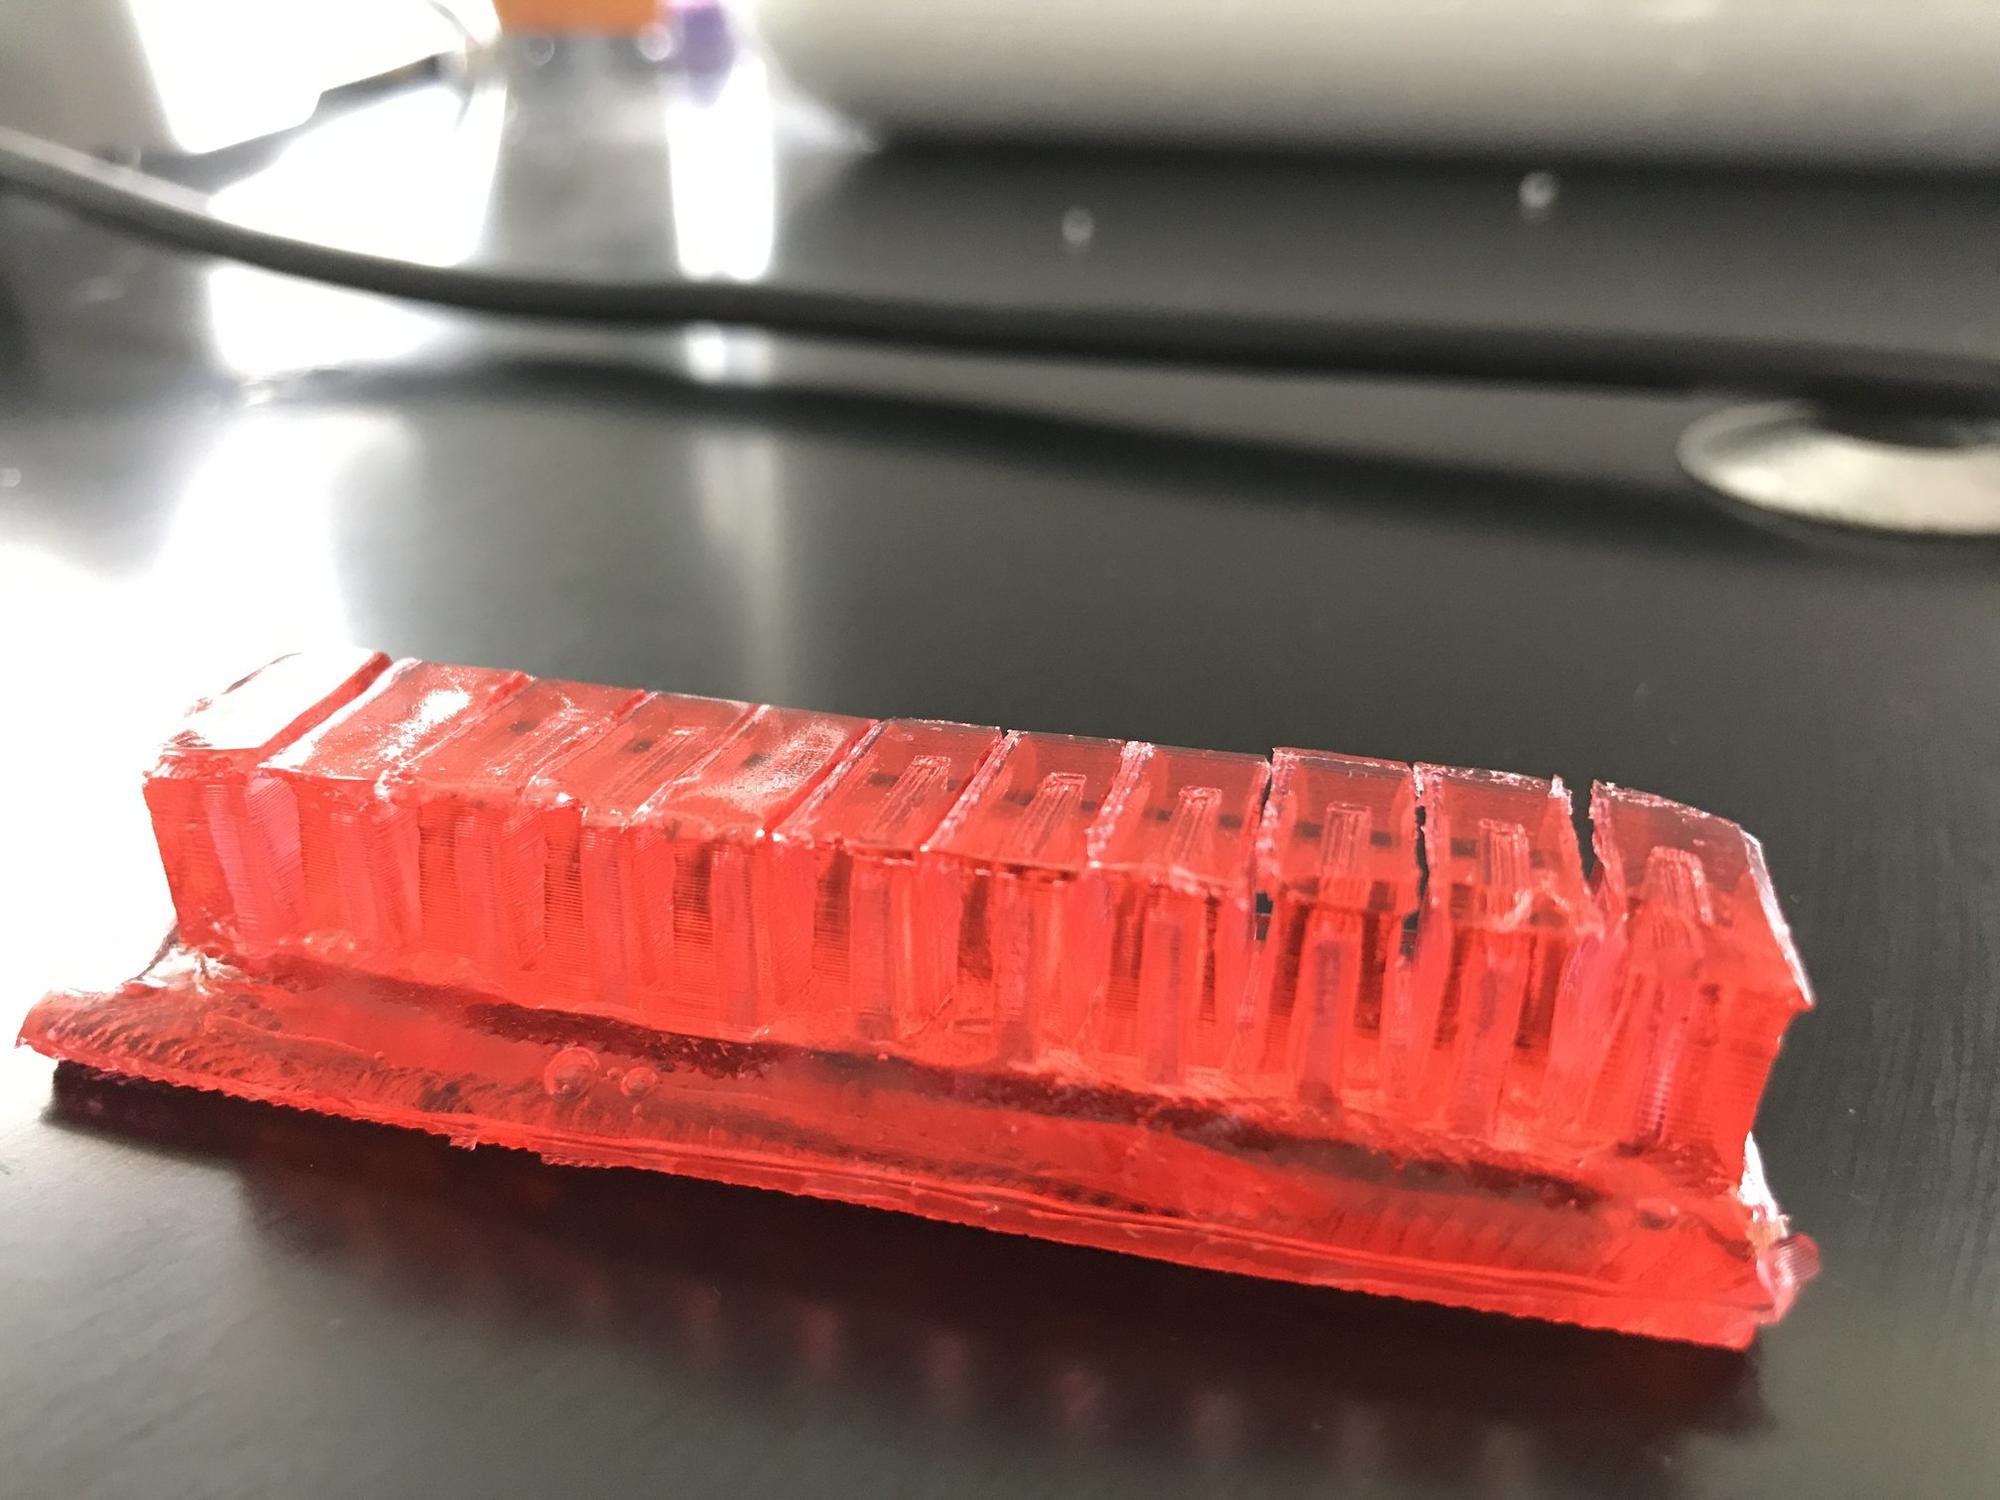
| Figure 22: 3.2 Actuator |
|
| Figure 22 displays the candy actuator using the Fordmula. |
Fabrication
Make Your Own Edible Actuator
Included below are two descriptions of fabrication of actuators: (a) Gummy Bear Actuators, and (b) Fordmula Actuators.
Gummy Bear Actuators
Step 1: Gather Gummy Bears of the same color. If you use the same color the actuators look nicer. Estimate the amount of bears you will need based on how many actuators you will make. Note that you will have about 25% waste in the beaker.
Step 2: Place Gummy Bears into beaker.
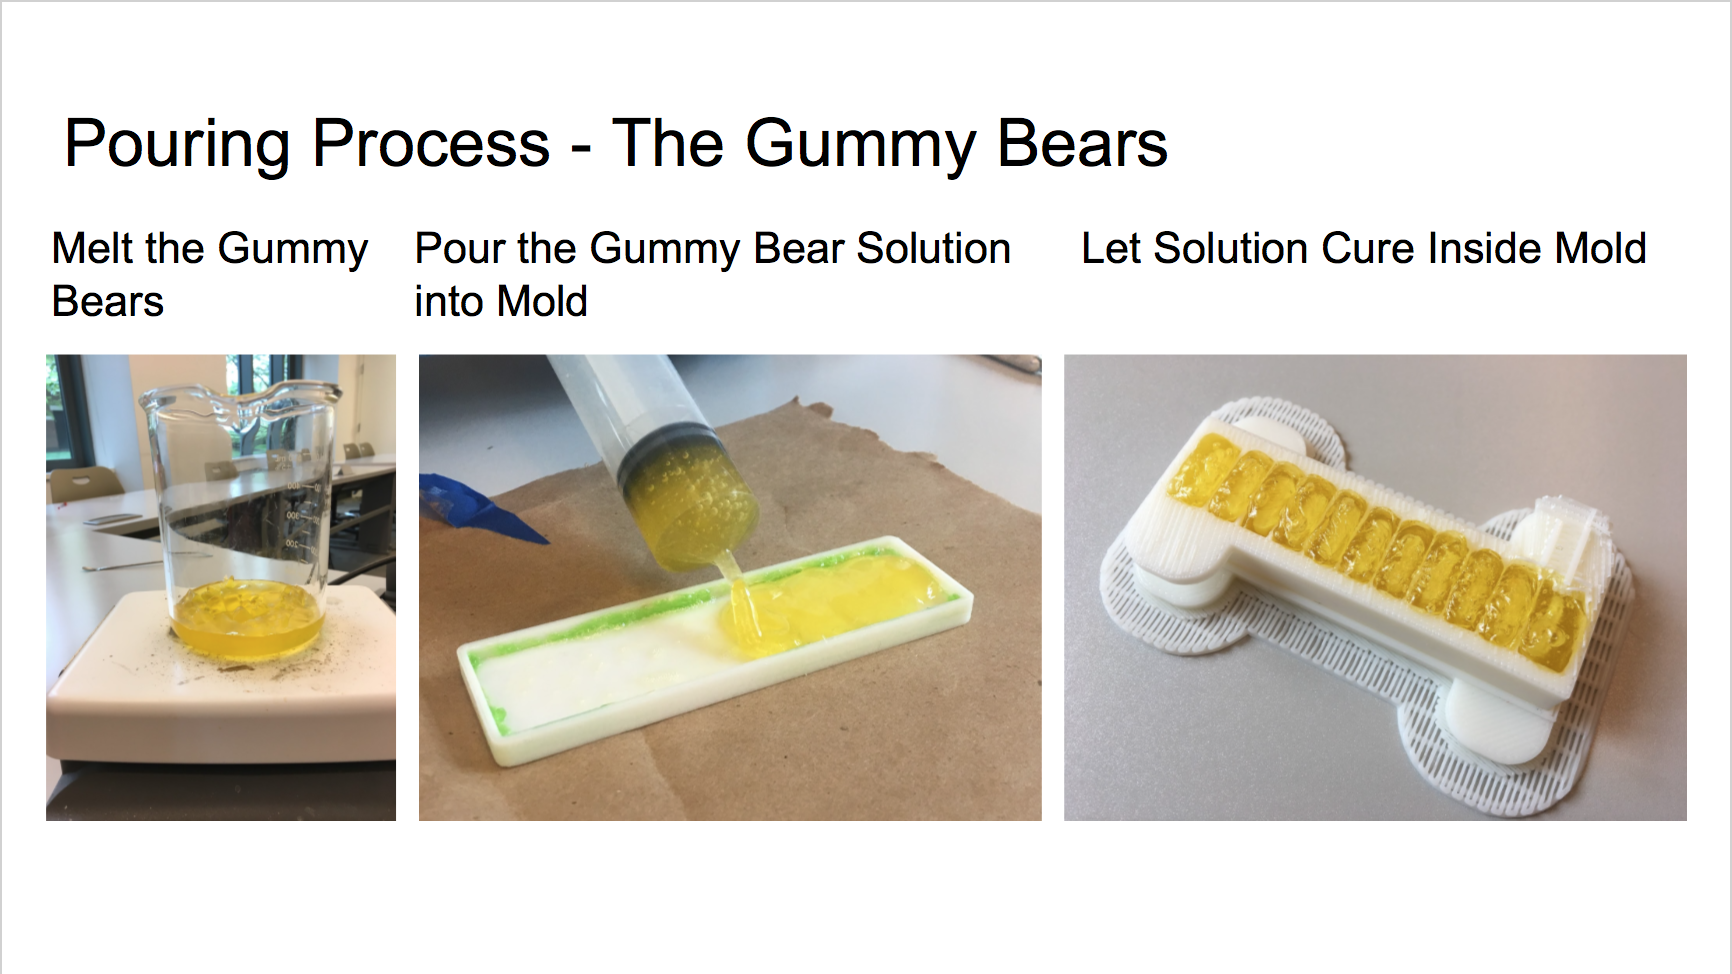
Step 3: Place the beaker on a hot plate set at 160°C(the actual temperature of the gummy was not measured) and let the solution sit on the hot plate until nearly completely liquid.
Step 4: Remove the beaker from the hot plate without stirring the solution. This would create bubbles.
Step 5: Pour the solution from the beaker into a syringe and slowly squirt it into the top mold and bottom mold.
Step 6: Put solution in mold in a sealed container (pyrex dish) with silica gel desiccant to absorb water vapor in the air. This will help the actuator cure. Let it sit till in a semi-solid mass resembling Jello.
Step 7: After 24 hours, demold the actuator parts and brush both in water. Let the pieces sit for about 3 minutes, then place the pieces together to glue them together.
| Figure 23: Gummy Bear Actuator Pouring Process |
|
The Fordmula Actuators
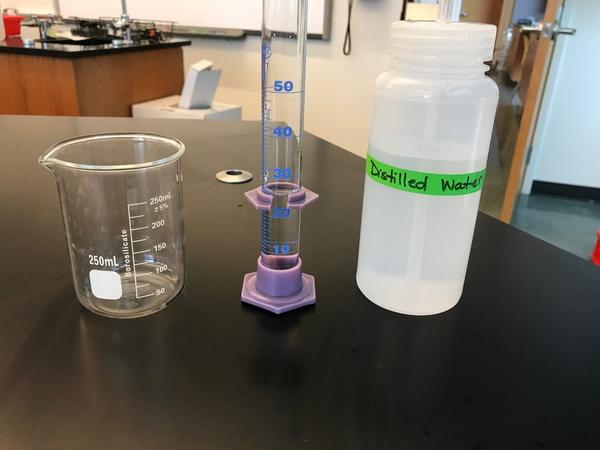
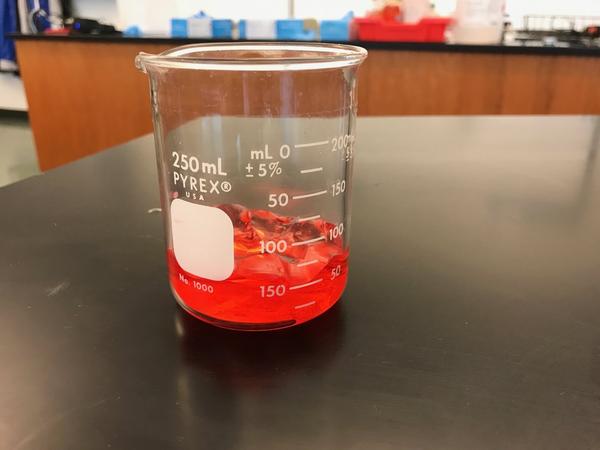
Step 1: Measure out 25 mL of distilled water in a graduated cylinder and pour it into a 250 mL beaker.
Figure 24: Step 1
|
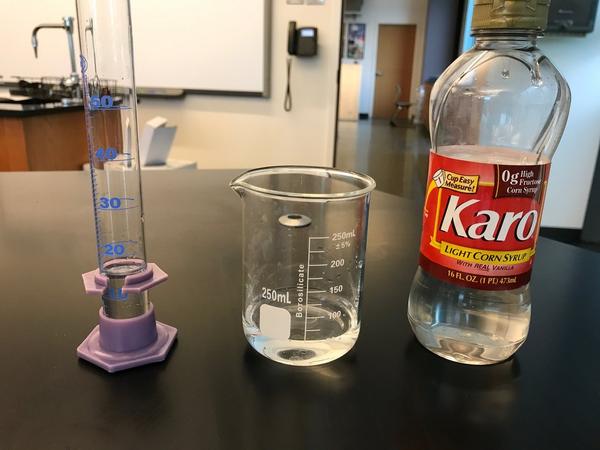
Step 2: Measure out 15 mL of Karo Light Corn Syrup in a graduated cylinder and pour it into a 250 mL beaker. The viscous nature of the syrup will make it stick to the graduated cylinder so you must take your time and be patient at this step.
| Figure 25: Step 2 |
|
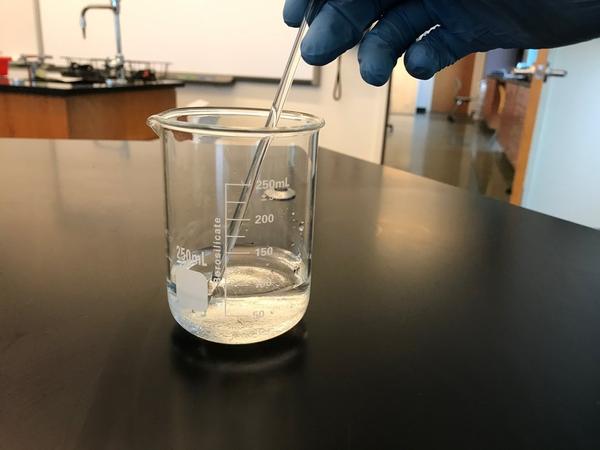
Step 3: Using a stir rod, stir the solvents together until a uniform solution is created.
| Figure 26: Step 3 |
|
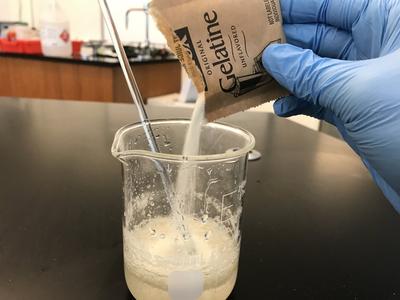
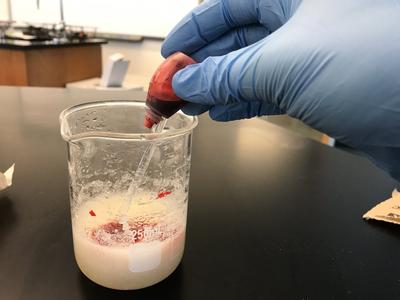
Step 4: Add one 7.2 gram packet of Knox unflavored cooking gelatin into the beaker. Stir the solution until it becomes uniform and there are no more white gelatin clumps. At this step you may also add any flavoring or any preferred food coloring.
| Figure 27 and 28: Step 4 | |
|
|
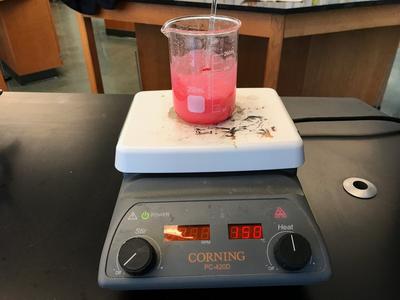
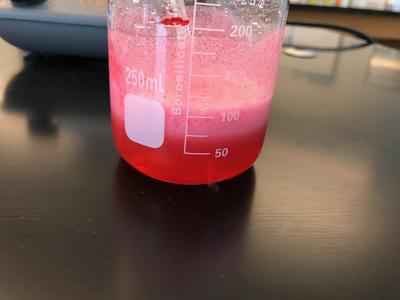
Step 5: Place the beaker on a hot plate set at 150°C(the actual temperature of the gummy was not measured) and let the solution heat for fifteen minutes until a murky top layer and a clear bottom layer forms.
| Figure 29 and 30: Step 5 | |
|
|
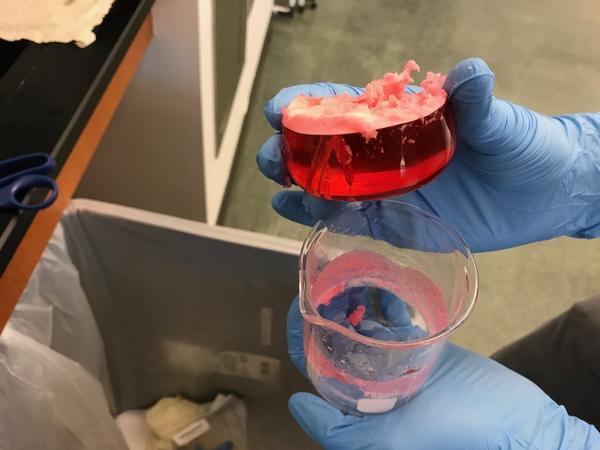
Step 6: Remove the beaker from the hot plate without stirring the solution. This would mix the two layers. Let the solution cool for at least on hour.
| Figure 31: Step 6 |
|
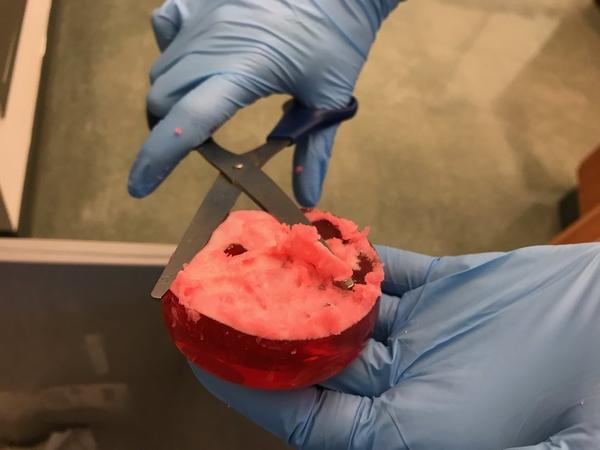
Step 7: The solution should be one semi-solid mass resembling Jello. Remove the continuous piece from the beaker while wearing gloves. Using a pair of scissors, trim the murky layer off the piece so there is only the clear layer remaining. Now place this glob into a clean new beaker.
| Figure 32: Step 7 |
|
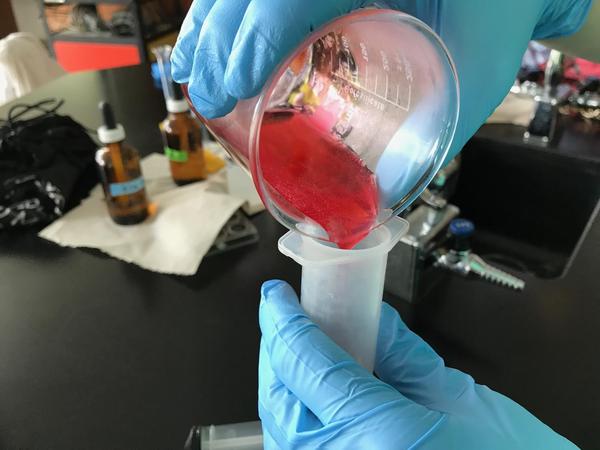
Step 8: Place the beaker back on the hot plate set at 150° Celsius and wait for the solution to completely melt.
| Figure 33: Step 9 |
|
Step 9: Pour the solution from the beaker into a syringe and slowly squirt it into the top mold and bottom mold. Make sure you leave enough solution in the beaker to attach the two parts later.
| Figure 34: Step 9 |
|
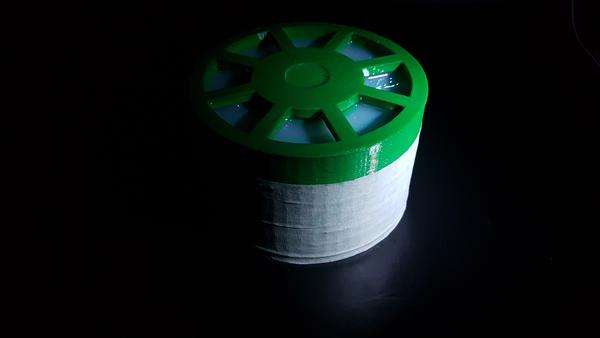
Step 10: After an hour the molds will be set!
| Figure 35: Photo of Step 10 |
|
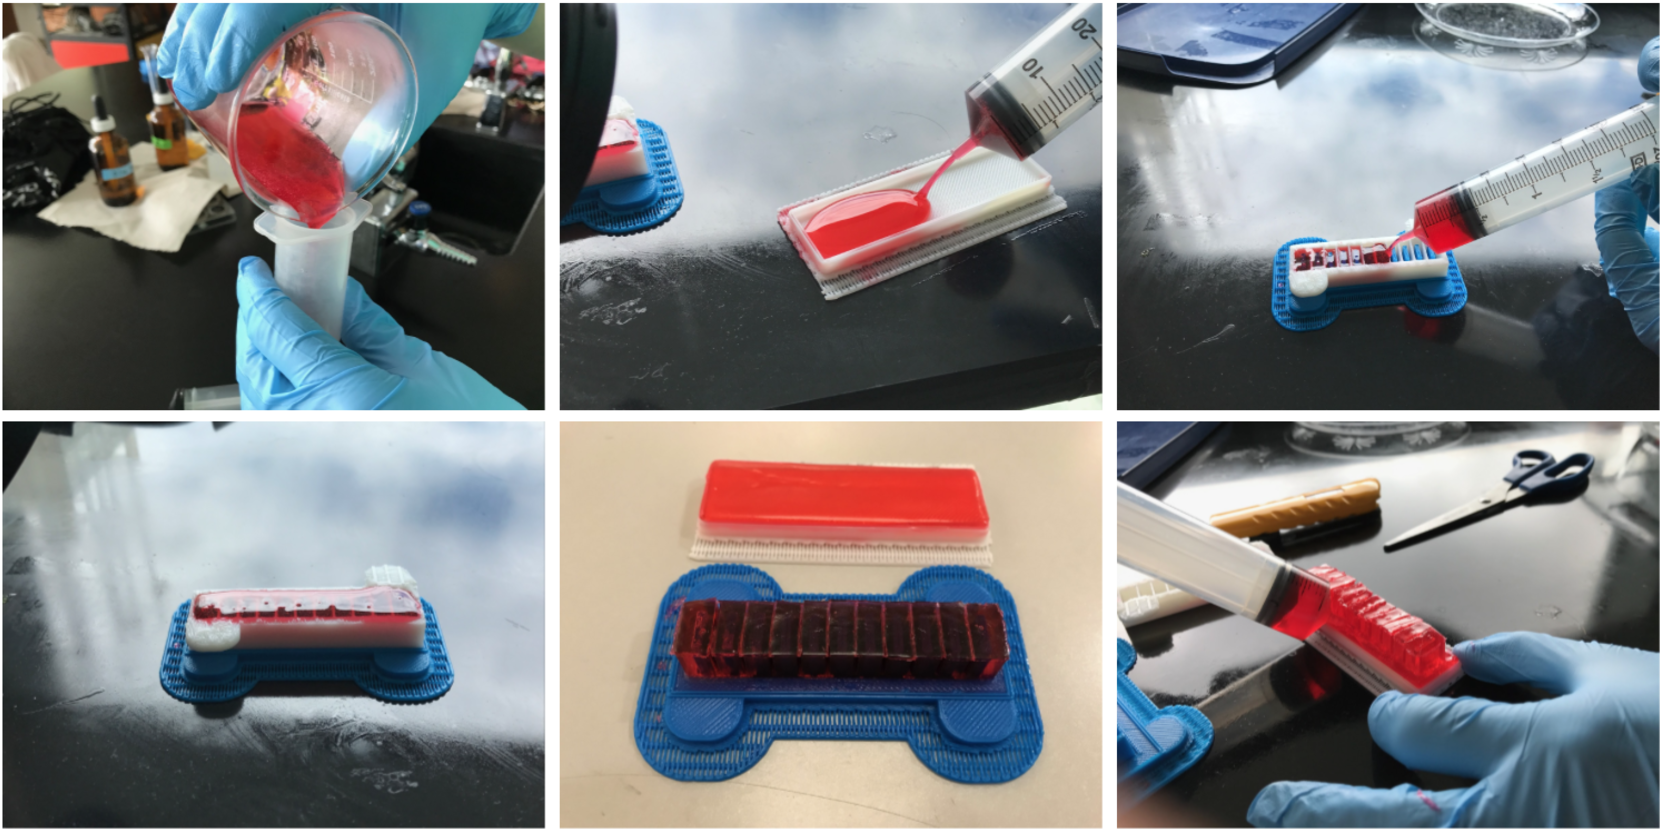
Step 11: This is the hardest step. Use the rest of the melted solution and pour it into another syringe. Carefully and quickly squirt the solution on the bottom of the top layer. Follow the edges and make sure not to fill the air channels. Place the top mold on the bottom mold and wait for them to adhere. You may also squirt some solution along the edges/seams of the actuator to ensure a better seal.
| Figure 36: Pouring Process |
|
Actuation
Once we prepared our actuators, we used 3 tools to inflate the devices, a 60 mL syringe for small actuators, a Ryobi Power Inflator, and the Fluidic Control Board described on the Soft Robotics Toolkit website.
The fluidic control board is the control center for the actuators. It controls how much air and when that air is pumped into the actuators. The board is controlled by an Arduino Mega, a microcontroller. The Arduino can take input values from air pressure sensors to log the pressure being pumped into the actuator. It can then regulate how much air the air pump is pumping according to to the sensor inputs and how much pressure the actuators can handle.
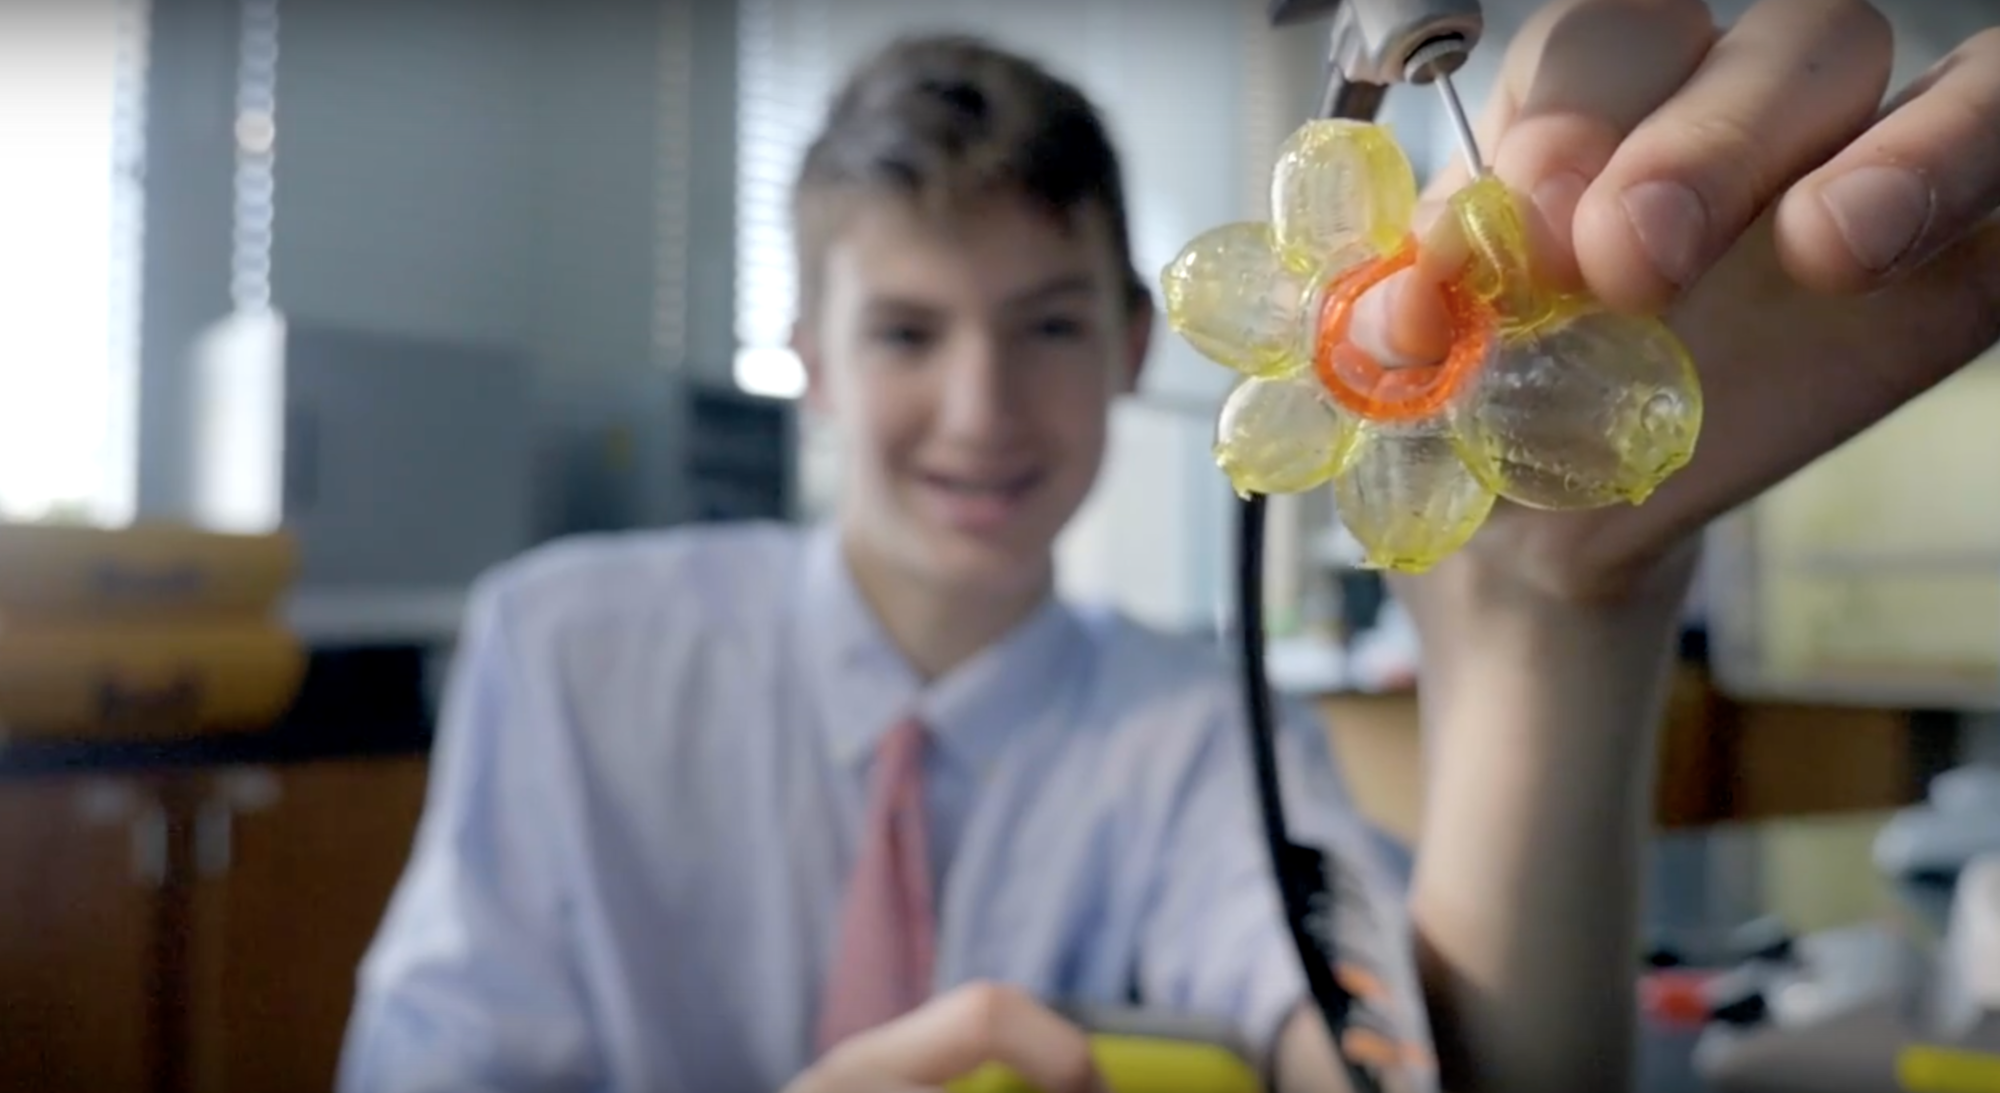
In our current design we manually insert the air source into the actuators. To ensure the seal, the air source and the actuator are physically held between fingertips (see Figure 54). We are hoping to work further to develop a secure connection between the actuator and air source. We propose using molded sugar, that would be hard enough to hold the air source pin, yet edible. We could also make a connector out of a plastic material similar to a lollipop stick.
Molding Process
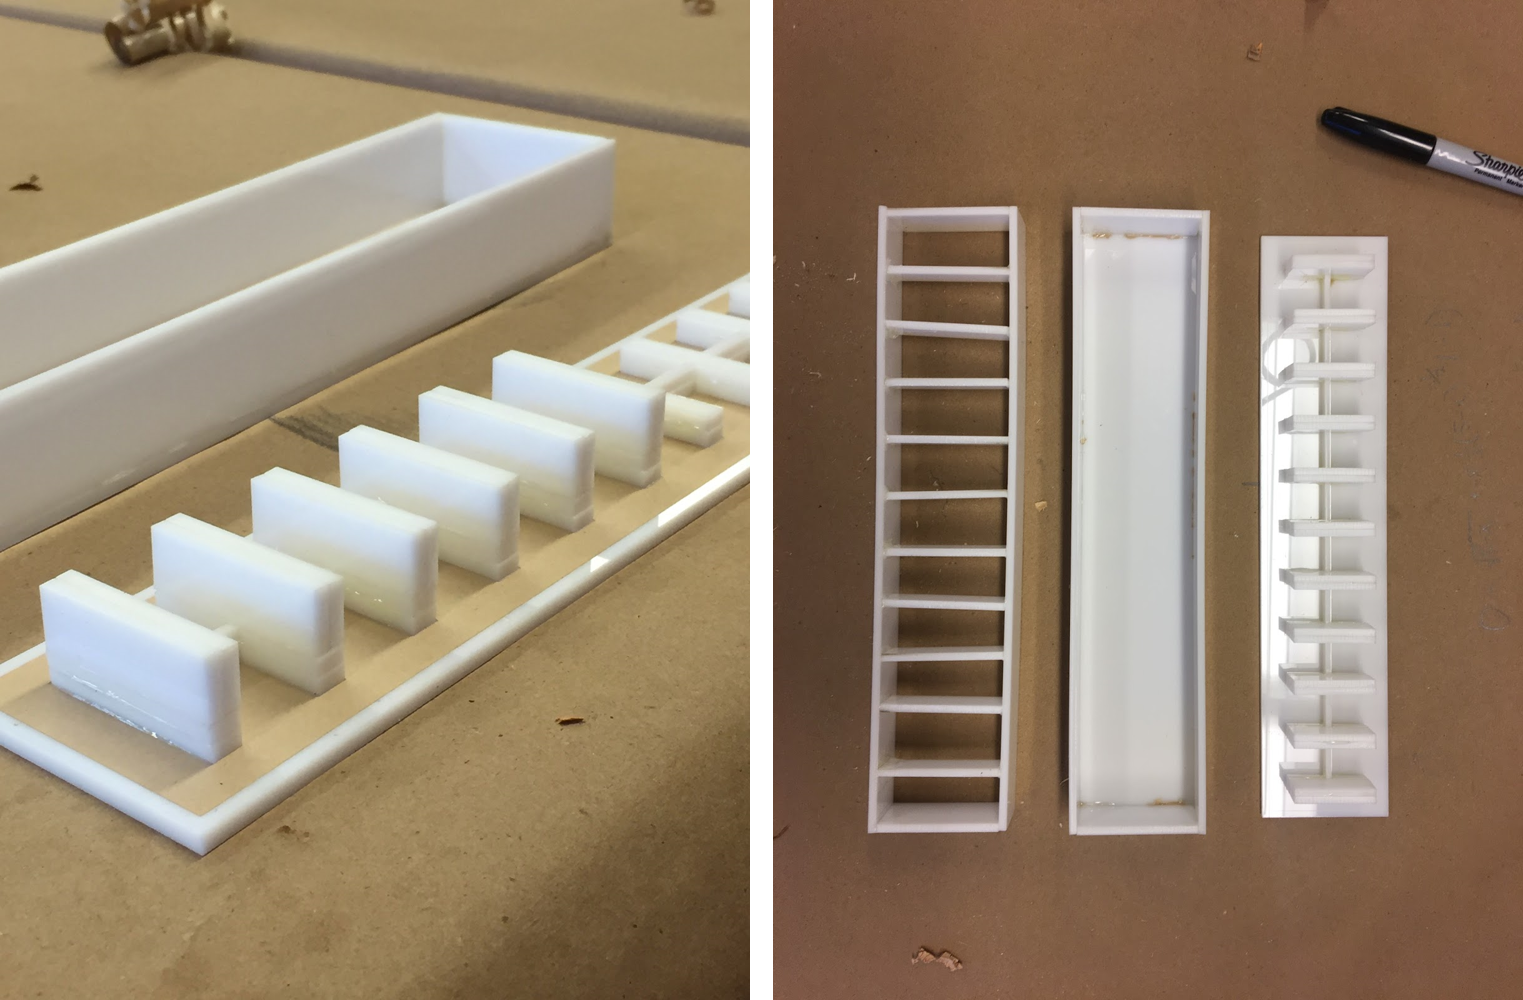
When we started the project, we decided to build a silicone actuator to learn about soft robotics and help inspire us. The actuator file was found through the soft robotics toolkit website, but we were having trouble with our 3D printer, resulting in a poor mold. While troubleshooting that, we decided to laser cut our mold out of acrylic and assemble it with a two part epoxy. The mold, as well as the silicone actuator, is shown below:
| Figure 37 and 38: The Original Mold |
|
This is our first mold of the silicone actuator. This was laser-cut out of acrylic material.
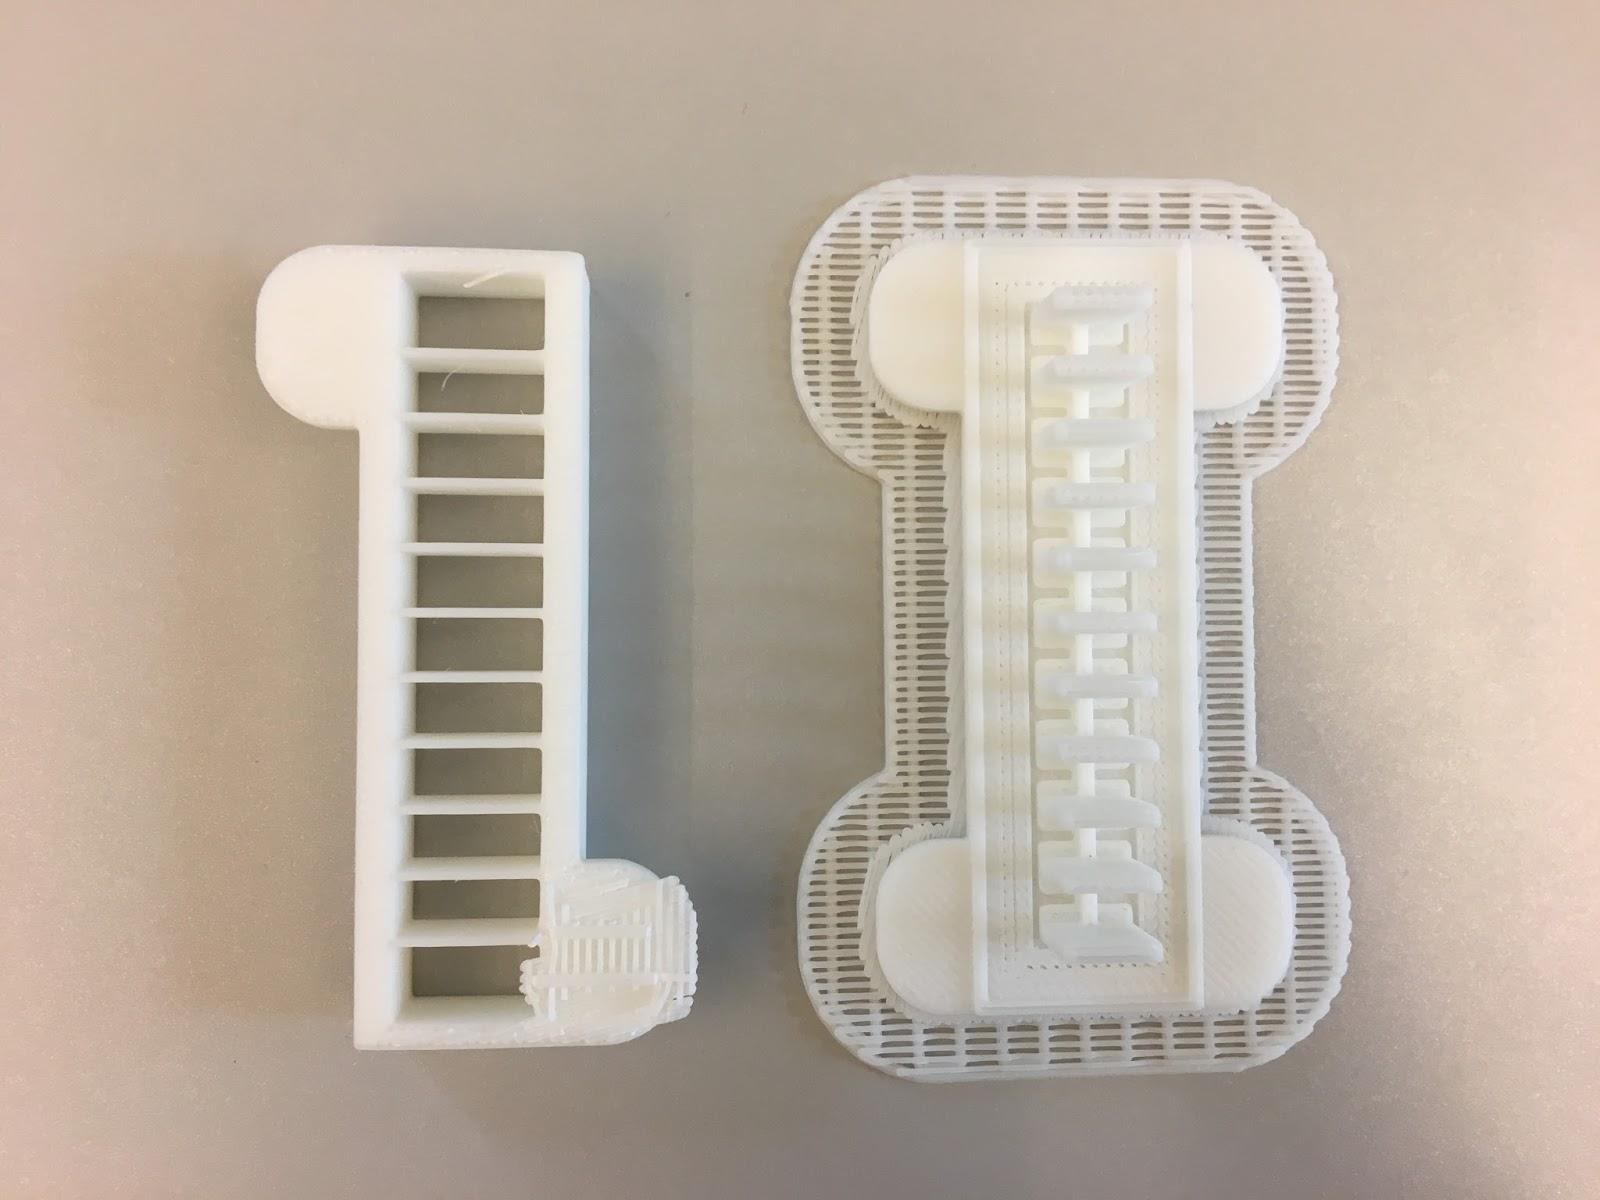
The team found that the mold was both too large and required too much acrylic to laser cut each time. Our school then invested in a proper 3D printer from which we were able to 3D print the file:
| Figure 39: 3D Printed Mold |
|
| This figure displays the 3D printed mold. |
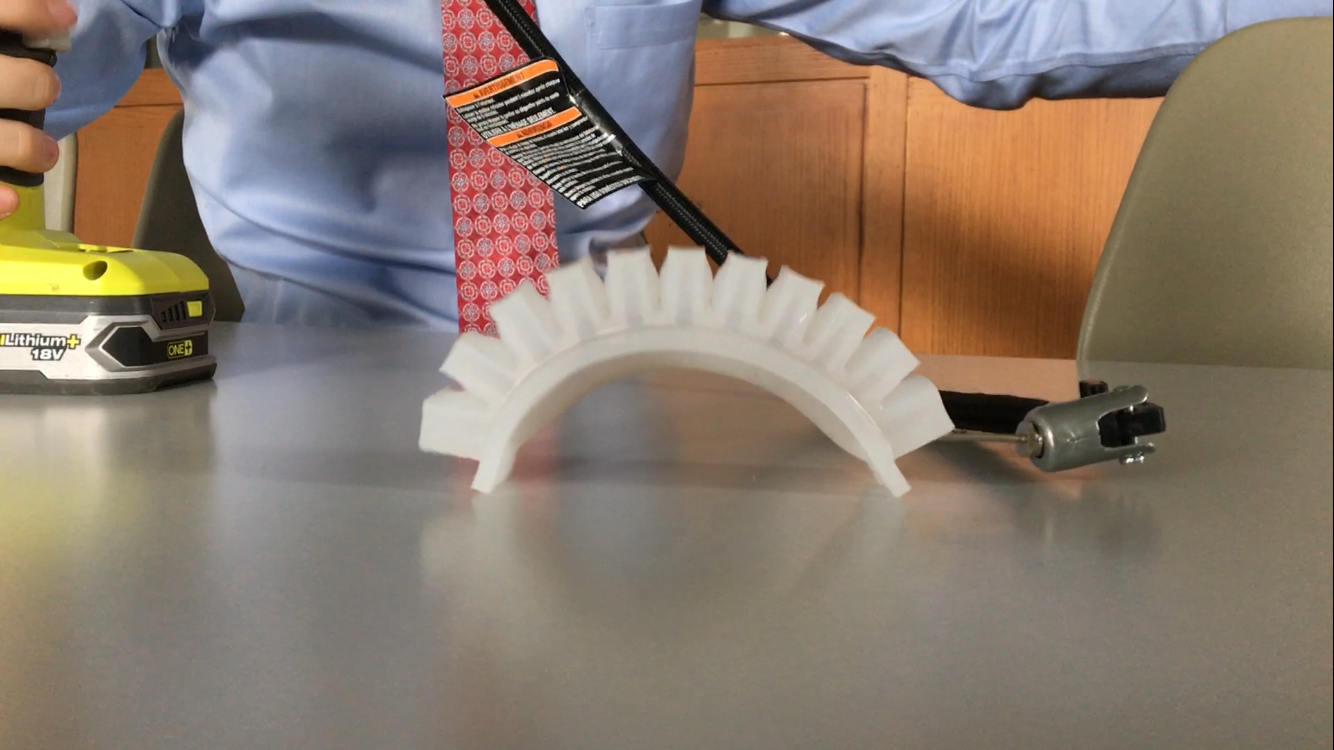
With this mold, we created a small silicone actuator that we were able to inflate:
| Figure 40: Inflated Silicone Actuator |
|
|
The above figure displays the inflated silicone actuator. |
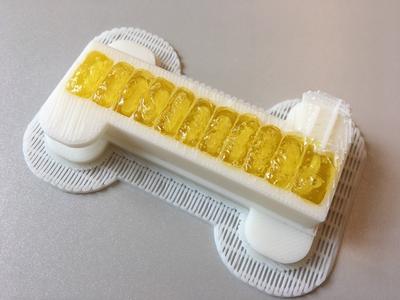
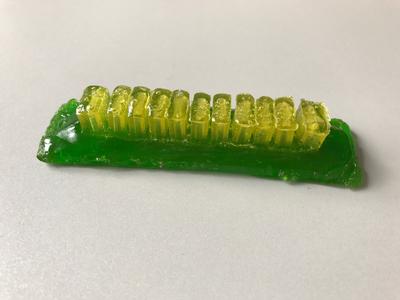
We then started testing the same mold but adding melted gummy bears instead of silicone.
| Figure 41 and 42: Candy Actuators | |
|
|
| The above figures display the candy actuators. | |
We noticed that there was still some minor improvements to be made to all of the molds which we used. We changed the molds by decreasing the size of the lower cavity/base as well as modifying the size and depth of each of the individual air pockets which allow the actuator to bend.
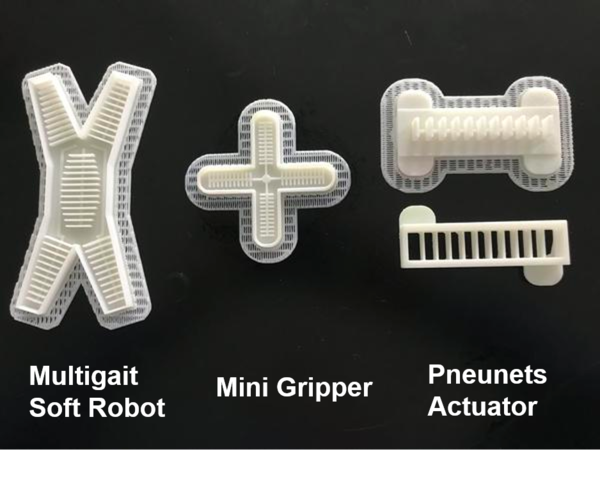
We used the following files to 3D print our molds.
1. Pneunets Bending Actuator from the Soft Robotics Toolkit.
2. Gripper Mold from Thingiverse
3. Multigate Mold from Dr. Whitesides
| Figure 43: Molds |
|
| The above figure shows the different molds we have 3D printed. |
Testing
To further validate our findings and to give us a path forward we performed both compression testing and a degradation study.
Mechanical Compression Testing
To build edible pneumatic actuators, we melted gummy bears at hot plate setting of 160℃ and 260℃ (the actual temperature of the liquid was not measured) and cast the material into 3D printed molds. After 24 hours we removed the melted gummy actuators from the mold. We noticed that they were rather sticky. This increase in stickiness confirmed our suspicion that melting the gummy bears may cause some sort of chemical and mechanical change in the gummy material. Gummy bears are primarily made out of gelatin, corn syrup, and sugar. We believe that melting gummy bears breaks down the gelatin triple helix and when the melted gummies solidify it is expected that the triple helix structures reform. We performed compression tests on recast samples as well as native gummy bear samples using our Mechanical Testing System over a number of days to attempt to find out after how many days does the melted gummy bear start to have the properties that it originally had. We found that after around 3 days, recast gummy actuators start to have the stiffness of native gummy bears.
| Figure 44: MTS Testing |

|
| The above figure displays the MTS testing of a gummy bear. Our Mechanical Testing System has a 100N load cell which compress materials at a constant velocity as data is recorded every 0.1 seconds. |
| Figure 45: Graph of Gummy Bear Stiffness |

|
The above Figure displays the graph of the stiffness of the gummy bears with respect to time. The error bars indicate the standard deviation across 4 samples tested at each condition.
We took the average Strain vs. Stress for all of our samples and plotted the average values with associated standard deviations. As seen in Figure 45, after three days, the the data from the recast gummies, irrespective of temperature, overlap with the data from the native bears. While the recast gummy bears at day 7 were more elastic, they lacked visual and tactile appeal.
Upon completion of this experiment using MTS, it became clear that stress-strain relationship while a necessary condition, was not sufficient to define the right properties for a gummy bear like candy. The recast gummy bears (after 3 days of recasting) were sticky to feel and did not have the same texture as that of the native gummies at all. These observations prompted us to continue the search for a better formulation since the touch and feel of a candy is an important attribute.
In an effort to design a new material that achieves the mechanical stiffness of gummy bears in a shorter period of time (note, in the above experiment, we needed to wait 3 days) along with the other qualitative attributes of a gummy bear, we performed mechanical testing to determine the optimal ratios of all of the materials which are used to make gummy bears to make our own formulation.
| Figure 46a: Graph of Material Stiffness |

|
Note: Fordmula: n=1, Control and Day 3 160C: n=4. 160C Day 3 refers to the actuators made from gummy bears. We made them by heating gummy bears to 160C and after casting them we waited 3 days. Adding the silica gel desiccant the wait time changes from 3 days to 1 day.
The Fordmula after one day had higher stiffness than the native gummy bears and the recast gummy bears which we used to make our gummy bear actuators. This shows that after less than a day, the Fordmula had a higher elastic modulus than the native gummy bears and the recast gummy bears we used in our gummy bear actuators. This means that after an inflation the Fordmula would want to return to its original form more quickly. We also noticed that the Fordmula was not sticky at all which is a problem we encountered with our gummy bear actuators. This, both quantitative and qualitative, data allowed us to call our patent pending Fordmula a success.
Upon the creation of the Fordmula we performed compression testing on all of the different material actuators we created. We did a comparison between actuators made out of silicone, the Fordmula, and recast gummy bears. We added the control group of native gummy bears because it serves as a good reference point.
| Figure 46b: Graph Comparison of all Materials |

|
As seen in the graph the Fordmula is exactly what we had in mind when creating it. We wanted to create an actuator that has the ability to inflate numerous times and was easy to eat. The Fordmula has this exact ability as it is not as stiff and elastic as the silicone material but is still stiffer and more elastic than the gummy bear materials. This is good because if it was as elastic and stiff as the silicone it would be extremely difficult to bite and chew. The fact that it is stiffer and more elastic than the gummy bear materials show that it is stronger and can be actuated more than the gummy bear actuators. This also provided more proof as to the success of the Fordmula.
Degradation Study
Tasked with the challenge of improving the field of soft robotics, the team postulated the primary material of soft robotics should be biodegradable and biocompatible. Traditionally, silicone has been used for the creation of actuators, but this material is neither biodegradable nor biocompatible. Recently, researchers at Harvard University and Boston Children’s Hospital have created a thin silicone heart sleeve. The sleeve serves to help the heart beat. We thought it would be cool to have a biodegradable heart sleeve, but, of course, didn’t attempt because we do not yet have the resources to test such a device at our high school. Instead, we conducted a study as a proof of concept with our gelatin-based candy actuators - for the purpose of showing our material is biodegradable. We used a degradation study to exhibit and simulate how our product’s material would degrade inside the body over time. This study was split into two experiments. In both experiments, the degradation was studied in a 8.0 g/L NaCl solution. We based the solution off of Tyrode's solution.
The first of the two was conducted with an actuator made out of orange melted gummy bears and a small square piece of the material made out of gelatin, water, and corn syrup, referred to as “3.2” or the Fordmula (Refer to The Fordmula section for information on the material).
| Figure 47: Degradation Study |

|
| The figure above shows the degradation of two actuators over time. The one on the left made from gummy bears. The one on the right made out of the Fordmula. |
The second experiment was conducted with an actuator made with the Fordmula.
| Figure 48: Graph of Actuation Mass vs. Time in Degradation Study |

|
| The above graph shows the actuator mass over time of the Degradation Study. |
| Figure 49: Graph of Actuation Volume vs. Time in Degradation Study |

|
| The above graph shows the actuator volume over time of the Degradation Study. |
The results of this study exhibit that our product is indeed biodegradable. Additional products may be added or ratios can be altered with the material to make it degrade at a faster or slower rate in the body. This is shown by the juxtaposition of the degradation of gummy bears and the Fordmula. Combined with the natural biocompatibility, our product’s biodegradable nature makes it a very strong candidate for use in the form of a soft robot in the body.
Success
Below is a video of our gummy bear actuator making multiple actuations which show that we had accomplished our goal and that the actuators work. We performed 8 actuations in the video (below) which is more than double our stated goal of 3 actuations. We also made actuators which tasted good. We gave our actuators to a small group of young boys who all enjoyed eating the actuators proving that they tasted good.
| Videos by Intel Chen |
Field Testing
Being teenagers in an all boy preparatory school, it is apparent that candy plays a major role in the dietary habits of many students. In addition our school has a robotics program which has quickly gained prominence on the global level. Combining these two growing markets we felt the team could further enhance the world of soft robotics. While sugary candy might not be the best thing for you, this new market that we are hoping to create can enhance not just the advanced side of soft robotics but also the fundamental side. On the advanced side we can create soft robots that are edible and perform all the functions that its silicon counterpart can. On the fundamental side we are able to create a simple interactive kids toys out of melted gummy bears or FORDmula which will hopefully peak young children's interests in science.
We wanted to see how the product could be potentially viewed by people outside of Soft Robotics. We asked a group of our peers and teachers a series of questions:
1. Do you think this is cool?
2. Would you buy candy that moves?
3. Would you buy your child(ren) edible robots?
All of the students said that they would consider buying this product or a similar product for their future kids. When asked about their opinion on the robots was unsettlement at first because it felt wrong, being able to play with food or eat something that is moving. However, as they started to learn more about these soft robots they became increasingly intrigued and excited about these soft robots.
Along with the high school students we showed our soft robots to teachers and their school aged sons. We had a focus group with boys who were in kindergarten, first grade, and third grade. The teachers thought this project was, "totally awesome" which was much different than the initial reaction of the high school students. The younger boys had a blast with the gummy actuators and enjoyed learning how they work, playing with them, and, maybe most of all, eating them. The way their faces lit up when we brought moving gummy bears is proof that this is a product which will be loved by both parents and young children. We believe that the target audience is both young children, ages 3-10, and their parents. We believe that if we were to commercialize gummy actuators it would be as a fun toy that parents can use with their children as well as sparking an interest in STEM, particularly science and engineering. With our instructions laid on this website, it would also be easy for families at home to create these actuators in their kitchens using household equipment and groceries store supplies.
| Figures 50-53: Highlights of our focus group with the young boys. | |

|

|

|
|

|
The first two pictures show the boys learning about soft robotics and what these gummy actuators are. The second two pictures depict the boys playing with the actuators and eating them.
The joy on the boys' faces as they ate the gummy actuators is proof that they enjoyed playing with and eating the actuators.
Future Opportunities
We had a lot of fun working on this project. We have filed a provisional patent on the Fordmula, US Patent Application Number 62/517,299, entitled "EDIBLE PNEUMATIC SOFT ROBOTIC ACTUATORS", filed on June 9, 2017 by The Haverford School. Moving forward we are still thinking of how we could potentially market the soft robotic gummy bears as a toy and a learning tool. The details around the product still need to be worked out. Detail such as, who makes the actuators, us or the kids, and how would they inflate the actuator. While we have not yet fully solved the connection between the air source and the actuator, that is the main thing to focus on if we want sell the product. We are currently holding it with our fingers and as we continue to develop this project further, we'd like to focus on a secure connection point.
We are proud of our creation as it is something to our knowledge that has never been done before, 100% edible actuators. We believe that we have made progress in the field of edible actuators that taste good. After seeing the kids play with the actuators we have come up with a list of a few action items for us to do moving forward as we continue this project.
1. Make the Fordmula taste good. While the Fordmula works well as an actuator, we need to improve its taste. While we have experimented with adding flavor a few times, our main focus was successful actuation with grocery store materials. Moving forward we aim to make the Fordmula as pleasant to eat as a gummy bear. We have done some preliminary testing with adding flavoring to the Fordmula, while it is safe to eat, it is not incredibly tasteful yet.
2. A good connection to an air source. Part of the reason why the product would occasionally leak is because we were adding tubing and holding that tubing in place by hand. This could cause the gummy material to tear in places creating leaks. We believe that the biggest thing for us to work on at the moment is to create a good connection between the air source and the actuators. Essentially we want to develop a valve for the actuators. We are thinking of creating a valve out of hard candy to continue to the theme of candy. Plastic may also be an option similar to a lollipop stick.
Our project was to create gummy bear actuators which function and taste good, both of which we did. We were not happy with some aspects of the gummy bear actuators and we decided to create our own formulation known as the Fordmula. Both actuators work well but we recognize that we still have to make some minor changes to the Fordmula to make it even better.
All in all we believe that our research in gelatin actuators has applications both in the body and in the classroom furthering the field of soft robotics.
| Figure 54: Physically holding the air source to the actuator |
|
Contributors
Meet the Team

|
Who Are We?
We are a group of high schoolers (and one middle schooler) from The Haverford School located in the suburbs of Philadelphia.
From Left to Right
Kyle Wagner (Junior) - Kyle is one of the founders of the Soft Robotics Team. He helps out around the lab by fabricating and testing actuators. He is also a member of the Haverford VEX Robotics Team, a writer for Haverford School Newspaper, and plays on the Varsity Soccer Team.
Richard "Cal" Buonocore (Junior) - Cal helps brainstorm applications of the product as well as helps around the lab. Besides Soft Robotics, he is the captain of the Varsity Golf Team and the Varsity Hockey Team.
Xavier Segal (Junior) - Xavi is one of the founders of the Soft Robotics Team. He spends most of his time designing experiments but is also involved in all aspects of the project. Outside of Soft Robotics, Xavi is the captain of Varsity Debate Team, president of the Sustainability Alliance and a member of the Golf Team.
Matthew Baumholtz (Junior) - Matthew is one of the founders of the Soft Robotics Team. He is a co-lead on documentation and is frequently helping out around the lab and is involved with all aspects of the project. Other than Soft Robotics, Matt plays Varsity Water Polo and is a member of the Varsity Debate Team.
Aditya Sardesai (Freshman) - Aditya is one of the founders of the Soft Robotics Team. On the team he runs the testing/data analysis, works on the wiki, and helps around the lab. Other than Soft Robotics, he competes competitively on the Haverford Robotics Team. He also writes for the school newspaper and math and science journal.
Ruhao "Henry" Sun (Sophomore) - Henry helps out around the Soft Robotics lab. He also plays soccer, and is the manager of the basketball team.
Not Pictured:
Bram Schork (7th Grader) - Bram created the fluidic control board to attempt to make the multigate actuator work. Bram is a fan of arduino and has won several science competitions in the Philadelphia area. He is also a member of the middle school robotics team.
Yiheng "Intel" Chen (Sophomore)- Intel filmed the videos. Intel is also an avid member of the VEX Robotics Team at Haverford. In his free time Intel enjoys photography and has had many of his photographs published in various publications.

|
We would like to thank:
Ms. Golecki for helping us through every step of this project and sparking our interest in soft robotics
Mr. Trocano for the help, guidance, and advice during this project and for letting us use the Chemistry Lab
Dr. Li for helping us to file a provisional patent
Thank you also to:
Ms. Lambour, Ms. Turlish, and Dr. Fenton for bringing your sons to see the candy actuators
Ms. Snyder for letting us work in the Upper School Library
Mr. Maley for guidance, helping us with ideas, and advice throughout this project
Mr. Stambaugh and Chris Williams '17 for reviewing the rough draft of the wiki and suggesting edits
Graham Haabestad, Will Baltrus, and David McKay for the help.