Testing
To further test our findings and to provide us with a path forward, we performed durability, solubility, and actuation testing on the King Actuator.
We tested different materials for the inserts. We tested the time, temperature, as well as conducted a comparative analysis between the polystyrene and the polyvinyl alcohol. Durability testing was performed by observing the time to delaminate or rupture an actuator for different fabrication techniques. We also did qualitative to see if the King Actuators could achieve the same bending as PneuNet actuators.
As a part of our effort to apply the King Actuator as a teaching tool, we performed pressure data collection and clay pottery image analysis on the pots thrown by professionals and students.
We attempted to prove the validity of the King Actuator in pottery instruction through data collection and image analysis. Unfortunately, we were unable to consistently and accurately output pressures to the actuators on the hands of the student. Thus, our effort to further the effectiveness the use of soft robotics in the ceramics classroom is still underway. Nevertheless, we were able to read pressures and are able to output a square wave representation of the data. As a testament to our new fabrication method, the actuators did not delaminate or rupture while throwing pots, demonstrating the durability of the King Acutator.
30 Second Video by Intel Chen


Solubility, Durability, and Qualitative Testing of King Actuator
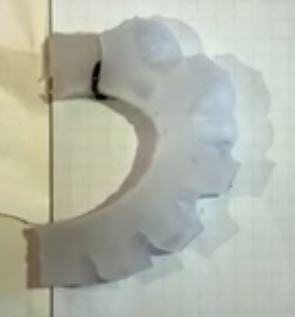
The King Actuator
Solubility Testing
Prior to using the PVA inserts in our actuators, the King Actuator inserts were carved using PS, more commonly known as styrofoam. These inserts had to be cut by hand, a tedious and time consuming process. In addition, the factor of human error made it nearly impossible to ensure that the cells of the insert were identical to each other. This was not ideal because the actuators would never turn out identical, removing the possibility of consistency within our tests. We noticed that PS inserts were less dense than the silicone that covered them, meaning that the inserts would float to the top or shift into undesirable positions during the curing process. However, the PS inserts had one outstanding benefit: they instantly dissolved when they came in contact with acetone. Despite this, the various drawbacks led us to look into a 3D-printed filament that was easily soluble, allowing for a more consistent and reproduceable actuator. After some research, we decided that using PVA as the filament would yield the best results.
A quick comparison of the two materials yields:
Comparative Analysis of Polyvinyl Alcohol and Polystyrene
| Material | Polyvinyl Alcohol (PVA) | Polystyrene (PS) |
| Profile | Hollow | Solid |
| Durability | Durable | Fragile |
| Production | 3-D Printed | Hand Cut |
| Solubility | Water | Acetone |
| Dissoving Time | ~ hours depending on temperature | Instantly |
We conducted a dissolution test on two 3D-printed PVA inserts to gain a better understanding of the rate at which they dissolved. While we knew that the inserts dissolve faster in warmer water due to increased energy in the system, we also wanted to quantify the total time it would take to dissolve and the change in time increased temperature provides. Since the actuators became maleable after exposure to water, gathering quantitaive data such as mass in relation to time was not feasible. Instead, we designed an experiment where we took photos of the two inserts in different temperature solvents during noteworthy occurances and spaced intervals to collect qualitative data. The first hot plate was prehated to 100°C while the other was preheated to 200°C, with the masses of the two PVA internals being nearly identical (2.78 and 2.81 grams, respectively).
| Time Elapsed (minutes) | Images | Notes |
| 0 |

|
Our testbed with one heatbed preheated to 100°C (Left) and the other at 200°C (Right). The inserts have not been exposed to the water at this point in time. |
| 1 |

|
No distinguishable change. |
| 5 |

|
No distinguishable change. |
| 10 |
200C
|
Visible difference between the 100°C (Left) and 200°C (Right) inserts. The 200°C insert began bubling, dissovling, and slightly arching. |
| 15 |

|
The 100°C (Left) insert began arching similar to 200°C insert at 10 minutes. However the water of 200°C (Right) insert became murky, a sign of dissolving. |
| 20 |

|
The 200°C (Right) insert arched deeply. |
| 30 |
100°C
|
The 100°C (Left) insert began arching similarly. |
| 37 |
100°C
200°C
|
The 100°C insert continues to arch. The 200°C however began to arch inwardly, perhaps a sign of little support material the the two points around the clamp. |
| 55 |
100°C
200°C
|
The water for both inserts has become translucent. By this time the 200°C insert was completly dissolved. |
| 90 |

|
Finally the 100°C insert has dissolved. |


This experiment shed light on the benefits of using hotter water, specifically comparing the effectiveness of the two temperatures. However, after we successfully dissolved PVA inserts in our final claw mold, we noted that only the first few cavaties of the insert were exposed to heated water. In essense, only exposed portions of PVA dissolved, forcing us to cycle between dissolving and emptying maleable chunks in order to empty an actuator. While the experiement was successful, the outcome desmonstrated the lack of feasibility of the process in the application. Initially, we judged that the PVA insert was more ideal because of its versatility. However, the dissolution process was more tedious .
If we were to further this project we would do more in depth research in finding a 3D-printable material that completely and instantly dissolves in a solvent. We were considering using Acrylonitrile Butadiene Styrene (ABS) filament instead of the PVA because it dissolves quicker in acetone. The drawback is that we do not have the proper ventilation to safely print the ABS inserts. In addition, we could explore materials that could be cast into a insert mold and later dissolve the insert. This action would ultimately opened our options for more materials aside from 3D-printed ones.
Durability Testing
To confirm the quality of the King Actuator, we performed durability tests comparing various versions of the actuator and a PnueNet. We argued that solid tensile strength and ability to actuate with a high pressure airflow would accurately portray the quality and durability of the actuator. After fabricating actuators of comparable size, we inflated them using a Ryobi Power Inflator until they ruptured or delaminated. Using 240fps slow motion video, we noted PSI changes and when the actuator failed. This data shows us which actuator is able to withstand more pressure and which is the most durable for various applications.
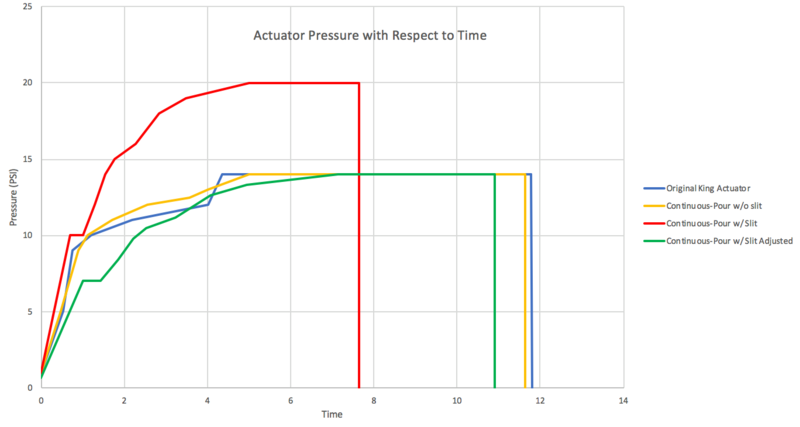
You can view vidoes of these pressures tests here.
While collecting the data, we experienced inconsistencies in PSI output from the pump because we did not charge the battery between tests for the Final Slit actuator and the PnueNet. As a result, the data may have been scaled differently. To compensate for this, we assumed there was a direct correlation between the maximum recorded PSI and the output PSI, and scaled the data down by a ratio of the maximum PSI of one line to the average of the other two, normalizing the data. From analyzing both data sets and the video, it was evident our single body actuators far outperformed the PnueNets. While the PnueNets delaminated instantly, the other actuators, (The Original King and the Continous Pour with and without slits) survived longer. We were not able to record any data for the PnueNets because it delaminated and burst instantly. However, our actuators still suffered problems. Each of our actuators failed when an air pocket opened between the fabric and silicone. The reason for failure is similar among all of the actuator types; when scaled down, all of our actuators failed at a similar point, further justifying the issue between the seal.
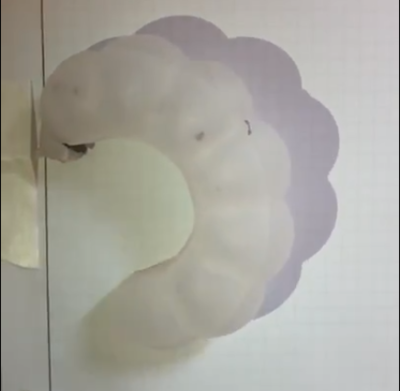
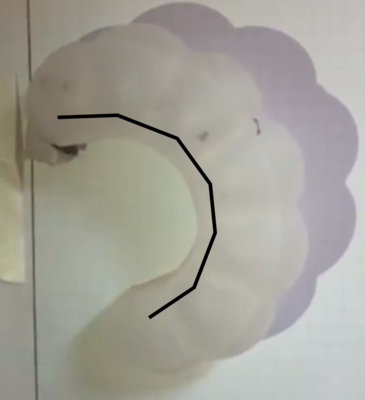
Qualitative Testing
A major component of any pneumatic actuator is its ability to bend with applied pressure. We plotted the curve of the actuators and compared thier general shape.
| Original King | Continuous Pour (No Slits) | Continous Pour (With Slits) |
|
|
|
|

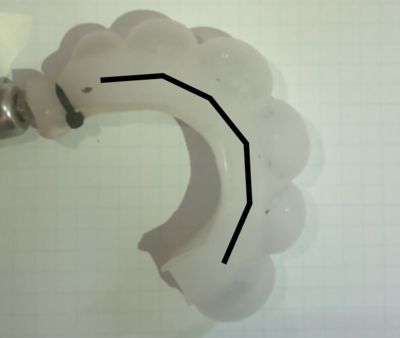
All of the actuators arched similarly, although the slotted continous pour expanded within each section, causing the actuator to bend more at the start. In addition, the Continuous Slotted actuator we used had a manufacturing defect where the internal bent the oneside, causing a non-uniform curvature.
Insert Qualitative Testing
One of the benefits of using a 3D printed insert is that we can change and play with the shape of the cavites formed in the actuator when the PVA is dissolved, giving it its modularity. We 3D printed a set of variable inserts to make actuators out of and see how they impact actuation. We tested some of the internals proposed and noticed no significant visual differences between the different internal shapes in terms of actuation. This is likely due to the fact that as air gets pushed into the cavities it tends to push in the same pattern, thus no matter the shape and size of the cavity the expansion of the cavity will remain the same shape. For the future we would like to create more actuators with these variable shapes and test more volumes out to see if it really has no effect on actuation. However we did notice that the more complicated the shapes got, the harded the actuators were to actuate and remove the inserts from.

Data Collection and Output for Pottery
Pottery Instruction
As stated, one of the goals of this project was to help teach students to throw a pot more effectively. In order to do this we observed our ceramics teacher throw a pot. The process is highly complicated, including individual finger and arm motion. In order to begin addressing this problem, we worked with Mr. Raeder to simplify the process of throwing a pot to squeezing the edges of a block of rotating clay with two fingers. We figured that if we can replicate the pressure which the teacher is squeezing the clay and output it to actuators attached to the fingers of students, we would be able more effectively teach students how to throw a pot.
In order to output the pressure to the actuator we had to gather data collected from the teacher throwing a pot. To do that we created a glove with pressure sensors attached the tips of the pointer fingers to read the pressure which the teacher is exerting on the block of clay. Using an arduino control board we created a method we dubbed Active Hand Recording (AHR), in which the the glove, a flex sensor map, is constantly polled at a fixed rate, and the data (the placement of the fingers) from the glove is recorded using the Motion Tracking File/Compressed Motion Tracking File (MCI/CMCI), and the MCI Compression Algorithm (MaRS). The AHR constantly polled data from the glove at a fast and fixed rate meaning that latency and high-level detail were not an issue; however, the AHR system comes at a price.
The Active Hand Recording Analysis
| Pros | Cons |
| - Allows for high detail levels | - High file sizes depending on quality |
| - Less processing power required | - Complex algorithm (MaRS) in processing side code |
| - Possible redundancy allows for less data corruption at higher polling speeds | - Bitrate and data flow concerns |
| - Higher speeds and more data provides a better insight into the movements. |
The AHR system works through a three-step process.
1. The Arduino poll information from the glove.
2. The values from the glove are sent to the computer.
3. The computer recording-relatively timestamps the data and save it into a MCI file.
All of this happens at a certain rate, which depends on the Serial baud output rate.
The processing of the AHR data using the MaRS algorithm works through a two-step process.
1. Seek the MCI file for value consistencies within a threshold.
- Example: The hand is motionless for half of a second
2. If a consistency is found, shrink it to one 'average' byte and set the timestamp of the motion(s) accordingly.
- Example: 'The motionless hand at 00:05, 00:05.15, 00.05.43, 00.05.62, 00.06' is shrunk to 'the motionless hand at 00:05-00:06.'
Note: The algorithm can take a long time to work depending on the duration of the motion capture and speed of the processor.
From all of this we are able to retrieve a graph of the pressure as it relates to time (in this case frames).
 We built a fluidic control board in order to control the output of air to the actuators. However we struggled with understanding how to control the pressure of the actuators using pressure regulators we purchased. This forced us to simplify the process further which was obviously not ideal. We corrected the noise and the input data into a square wave to make for easier control of actuation. We converted the recorded pressure into a scale with the minimum recorded pressure changed to 0.
We only used one hand because there was not enough space in the center of the pots to perform controlled actuation. While recording data, sensors were put on both the right and left hands. We noticed that the force applied the outside edge had a greater impact on the straightness of the pot, as on average the right hand, the outside hand, applied more force to the pot than the inside hand. We could not control for the vertical motion of the student, however we believe that after observation, mimicing the vertical position of the hand was intuitive.


This method proved to be ineffective because we oversimplified the process of throwing a pot. Our largest issue was in controlling the fluidic control board's output of pressure for a long duration of time. We experienced difficulties with keeping the pump continuously working over the duration of throwing the put and thus were unable to actually, accurately test the quality of the MaRS algorithm in teaching novices to throw pots.

If we were given more time we would have liked to moved towards a Passive Hand Recording (PHR) system. PHR is a method in which if the glove moves, the data is recorded, unlike AHR which constantly records hand movements, moving or not.
| Pros | Cons |
| - Less file size than AHR | - Latency concerns |
| - Detail can still be captured | - Incorrect threshold values may cause loss of detail |
| - Runs with less data transfer speed required | - False triggering may occur depending on threshold values |
| - Less data corruption | - No backup/redundancy |
We however did not manage enough time to fully develop this method.
The code used throughout this entire project can be found here.
Image Analysis
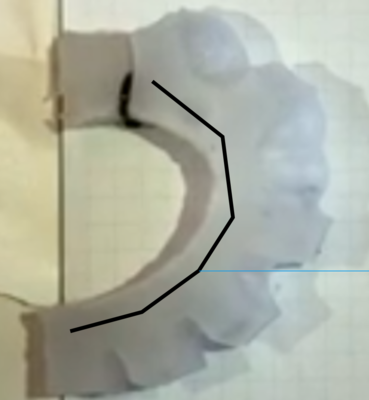
In order to determine whether or not our MaRS algorithm was more effective in teaching students to throw pots, we had to perform image analysis on the pictures of pots thrown by a teacher, a student after instruction with a teacher, and a student wearing the actuators. We decided that a good metric of analyzing the pots thrown by the individuals was to analyze how straight each of the pots were. To do that we split each pot in half to get a profile view of the edges of the pot. We determined where the base lay and drew a vertical line up from the midpoint of the base. We then, using ImageJ, measured the the distances, in pixels, of various lines to calculate the standard deviation of the lines in relation to the center line. Each side of the pot was split up into different component lines (as shown in the annotated image below) to determine the straightness of the pot. The hypothesis was that if the pot was completely straight then the distance between either edge of the pot from the center line should be the same, measured by standard deviation. Each component line had no more than 100 data points extrapolated from it. Smaller lines had fewer distances measured becuase there was less area to measure. All of our data can be found here.

As stated on our previous page about gathering and outputting data, we were unable to successfully output the pressures and make the actuator inflate consistently and in time to aid the student in throwing a put. Therefore, we, unfortunately, were unable to test the validity of this method of teaching students how to throw a pot. However, the actuators did hold up while they worked, proving that the King Actuator can be used in vigorous applications.

