Actuator Fabrication
The process for fabricating an actuator with one of the molds is almost the same as for a 3D printed PneuNet bending actuator mold (described in detail here):
- A top part is cast in the acrylic mold
- A bottom part is cut from a piece of silicone coated fabric
- The two parts are glued together with uncured silicone
- Tubing is attached
When the actuator is finished, it is connected to a source of pneumatic actuation.
Bill of Materials
To cast an actuator with one of the laser cut molds, the following is needed:
Materials
- Liquid silicone (Ecoflex 0030 or 0050)
- Silicone glue (Sil-Poxy)
- Non-stretch fabric (in a material that will absorb the liquid silicone, e.g. cotton)
- PVC tubing (ID/OD 1.5/3mm) (Silicone tubing can also be used, but is hard to push it into the actuator, as it is softer. It is, however, easier to fit onto a syringe, valve, pump, and Y connector)
- Mixing container (with volume indication if a scale is not used)
- Stirring stick
- Bamboo skewer (with an approx. diam. of 3mm)
- Cigarette lighter
- Rectangular piece of wood (a little larger than the mold)
Tools
- Pair of scissors
- X-Acto knife and ruler (optional)
Equipment
- Oven (optional) [Note: do not use an oven that is also used for food]
- Vacuum chamber (optional)
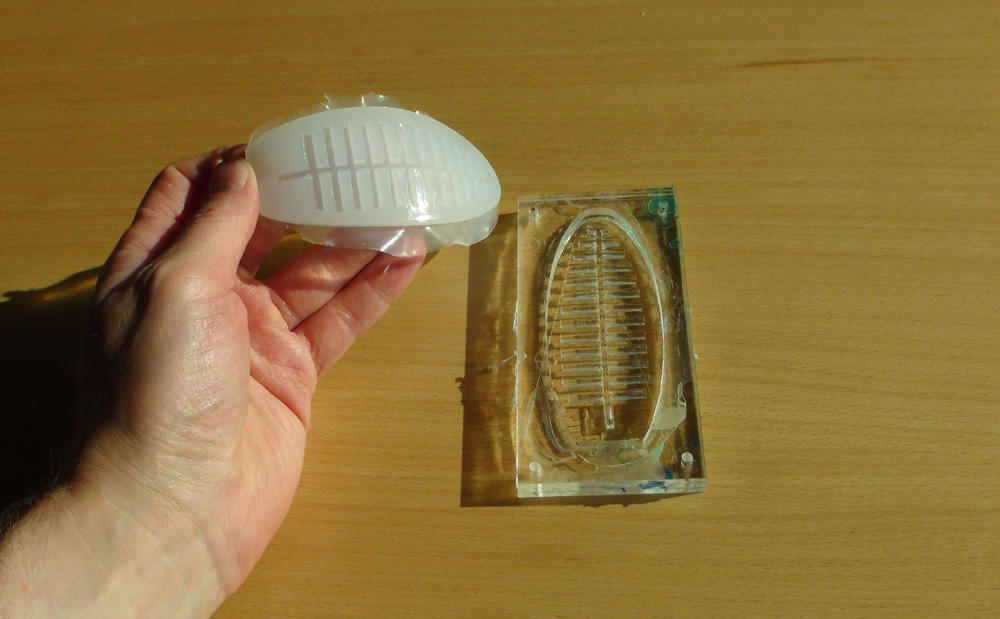
Step 1: Molding the Top Part
Preparing the Silicone
- Mix a batch of Ecoflex 0030 or 0050 silicone in a measuring cup. Approx. 20ml/0.6oz is needed to fill one of the molds if they are constructed from 3mm acrylic sheet. Add equal parts of part A and B (by volume or weight) (and silicone colour if using this). Mix by stirring vigorously with a stirring stick for 20-30 seconds

- Degas the uncured silicone in a vacuum chamber (optional)
Filling the Mold
- Stand mold on a level surface
- Fill the mold just to the top with uncured silicone
- Allow to stand for 5 minutes
-
Poke large visible bubbles (e.g. with a bamboo skewer) and refill mold if needed

Two filled molds
Curing
-
Cure the silicone by placing the mold in an oven for 20 minutes at 80°C or leaving it at room temperature for 4 hours

Two molds with cured silicone
Removing the Cast Part From the Mold
- Gently remove the cast part from the mold by lifting one of the ends up and then wiggling the silicone cast by pulling gently from side to side and upwards at the same time


Step 2: Casting and Cutting the Bottom Part
The bending actuators have strain limiting bottoms. These are made from Ecoflex 0030/0050 covered fabric and attached with a fresh batch of Ecoflex 0030/0050 acting as glue.
Casting Silicone Coated Fabric
- Place a piece of fabric on a flat non-absorbent surface
- Mix a batch of Ecoflex
- Pour a small amount of uncured Ecoflex onto the fabric surface
- Used a gloved finger to smear the uncured silicone so that it covers the surface with a layer of silicone that is approximately 1 mm thick
- Allow the silicone 4 hours to cure at room temperature

Cutting Bottom Part
- Place the cured silicone-coated fabric on a flat surface
- Measure out an appropriate sized piece by placing the actuator top parts on top of it
- Cut the piece with a pair of scissors
Step 3: Assembling the Parts
- Cut a piece of silicone coated fabric that is a little bit bigger than the actuator top part.
-
Mix a small batch of EcoFlex and pour a little onto the surface.

Uncured silicone is poured on -
Use a gloved finger to even out the liquid material over the whole surface - in a thickness of approx. 1 mm.

A glover finger is used to even out the uncured silicone -
Place the actuator top part into the uncured silicone, with the open side facing down. Gently press it into contact with the material

Actuator tops are placed into the uncured silicone - Place a rectangular piece of wood (or something similar) atop the actuator top part to gently weigh it down thus ensuring contact with the strain limiting bottom during curing
- Cure the acutator by putting it in the oven for approx. 35 mins. at 80°C or leaving at room temp. for 4 hours - the latter will create the most strongest bond between the two parts
- Once the silicone has cured, cut of the excess fabric along the sides of the actuator with a pair of scissors or by using a ruler and an X-Acto knife
Step 4: Attaching Tubing to the Actuator
-
Use a bamboo skewer to poke a small hole that goes to the inside of the actuator (be very careful when doing this, so that it does not get an additional puncture). The hole should be in the middle a little above where the top and bottom of the actuator meet. When a hole is made, pull out the skewer and insert the non-pointed end into the hole. Turn it around a couple of times to expand the hole diameter.

A hole is made with a bamboo skewer - Push the end of the PVC tubing into the hole
- Smear SilPoxy glue around the tubing where it enters the actuator. Make sure that the glue forms an airtight seal that fastens the tubing to the actuator. Let the glue dry for 12 minutes