Soft Barrier
We are Daniel Beltran, Salma Mahmood, and Michelle Ghanime and we are three New Jersey Institute of Technology students studying architecture and design in an undergrad program. Our project is the culmination of a semester's worth of studies in smart materials and soft robotics in the context of architecture. Much of this work was conducted in the 2015 spring semester under the direction of Martina Decker, a professor with interest in emergent materials and technologies.

Special thanks to Professor Decker for all of her help and for all the cool stuff she has taught this past 2015 spring semester.
Background
Building energy consumption accounts for roughly forty percent of the total energy produced in the United States, most of which is still being generated by burning fossil fuels [1]. The predicted increase of the world population [2] will also add greatly to the future global energy demands in the constructed environment. Within buildings roughly a third of the energy is being spent on heating and cooling the interior environment. Building skins and architectural envelopes have a significant impact on the thermal conditions. In particular active and reactive interventions such as kinetic façade systems have been known to assist mechanical Heating Cooling and Ventilation and Air-conditioning (HVAC) systems.

The project development initially started with an exploration of heat transfer through construction materials including conduction, convection and radiation. Conduction in exterior wall systems can be modified by adding air spaces. They are instrumental in reducing the thermal transfer through materials assemblies. Convection could be addressed by designing a dynamic layer that could influence wind turbulences on the outer surface of the system. Radiation could be addressed through the use of thermochromic pigments, which can regulate the amount of solar energy emitted or absorbed in different outdoor temperatures.
These initial explorations led to the design of the Soft Barrier, which is a distributed soft robotic wall system that strives to control heat transfer through exterior architectural envelopes, by using air for the actuation mechanism as well as a vital material component in the assembly.
A similar type of system has already been developed and patented by Robert Alderman[3], but only focused on the conductive and radiation properties of an “inflatable and deflateable" heat insulation system.” Our proposal goes further by introducing smart materials and microcontrollers. This allows the design of a truly active and reactive system. Smart materials (Addington, 2005) are distinguished by their ability to respond to different stimuli in their surroundings with a significant change of their properties. They are their own sensors, actuators and they do not depend on conventional energy sources such as electricity. They can operate on ambient energy fluctuations such as changing light conditions or temperature differentials. The use of microcontrollers and sensors is instrumental in the creation of an adaptable design. It takes input from the environmental conditions as well as the human users.
The soft robotic proposal was designed to act as a skin for a “manufactured” (Addington, 2009) interior environment. The new system of soft and distributed robots can be applied to a building from the exterior, to help control the thermal energy transfer with a very high spatial resolution. The lightweight silicone based robots have a number of pneumatic chambers and air layers and incorporate smart materials such as thermochromic and phosphorescent pigments. This system is controlled by a number of sensors and microcontrollers, making it an autonomous and dynamic soft robotic network, which humans can interact with safely.
Design and Project Goals
Our goals for this project were as followed:
- Research and outline a potential for soft robotics in architecture
- Design a soft robot that inflates and deflates to control heat transfer in building skins
- Integrate smart materials and microcontrollers for a dynamic system design
- Create a pneumatic actuator soft to the touch and lightweight
- Create a design for an autonomous soft robotic network
- Fabricate a prototype of a soft robotic element that can be tested
- Analyze the results and weaknesses of our design, prototype and gathered data
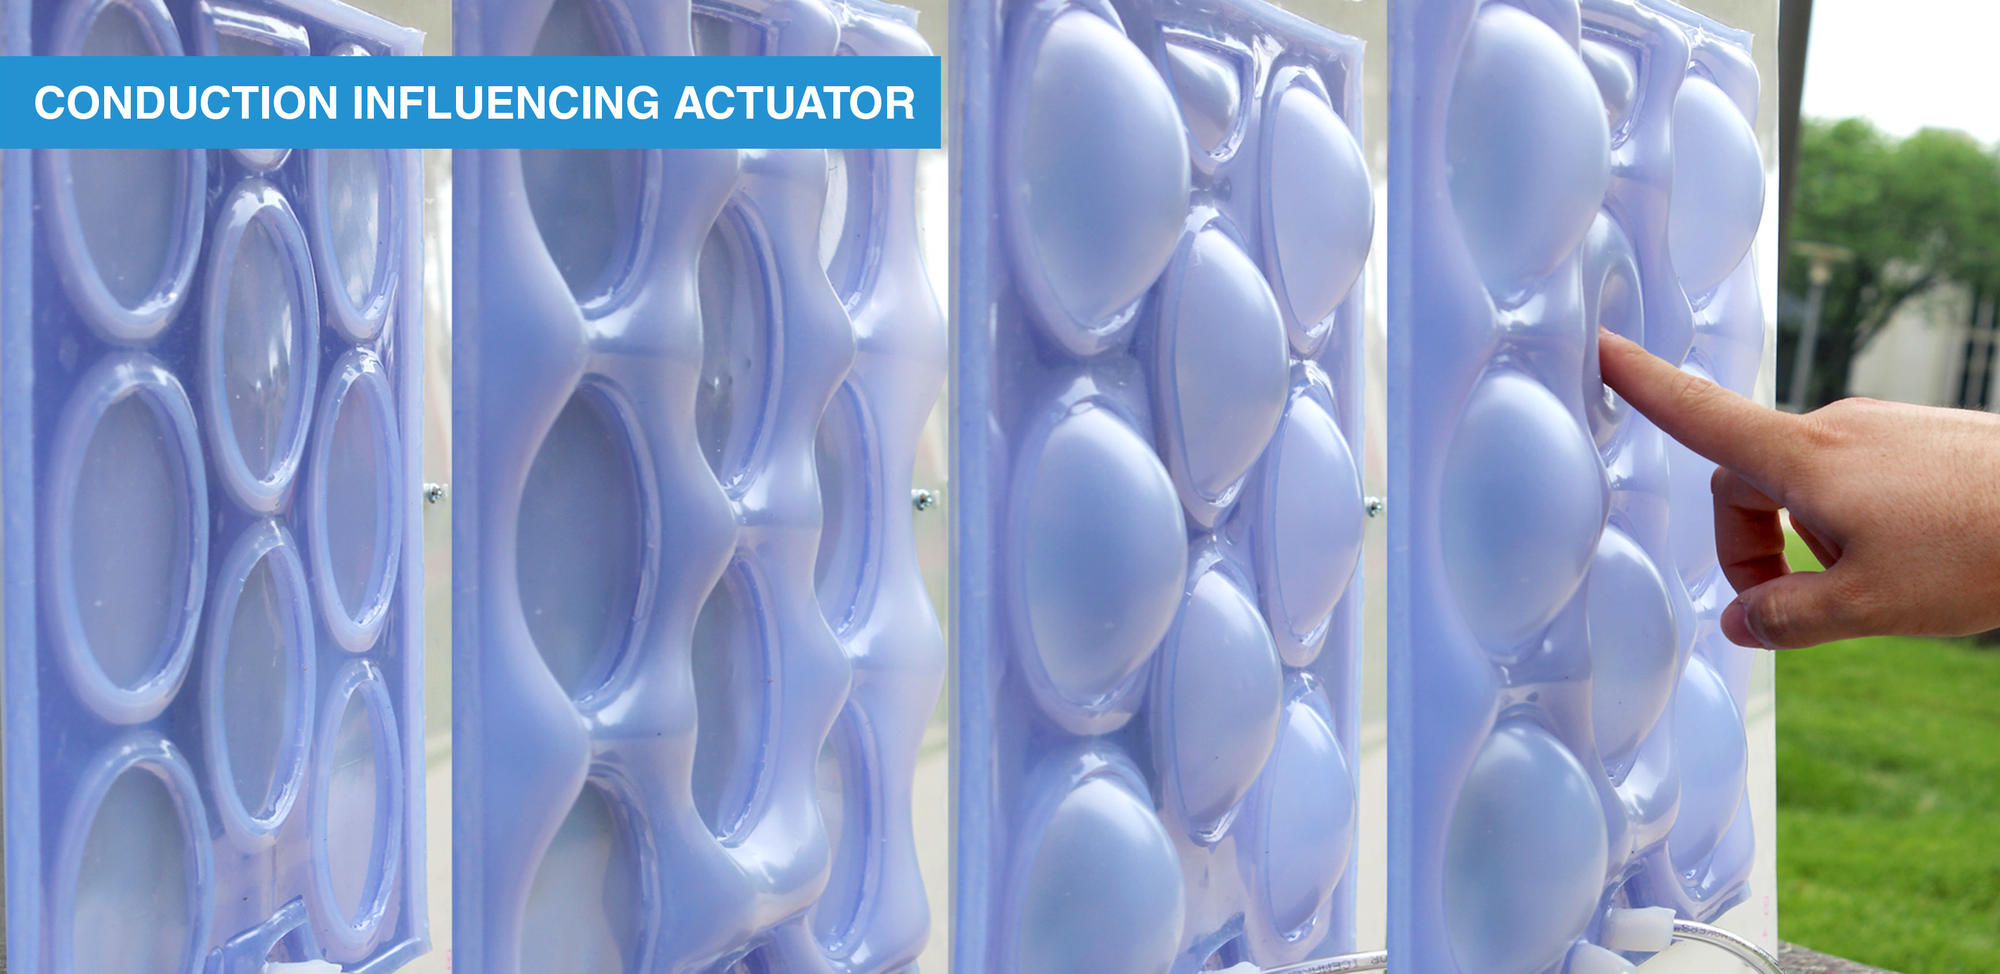
The design of the Soft Barrier incorporates aspects from the PneuNets actuator. Soft Barrier consists of two main types of actuators. One type creates a series of stacked air pockets to control conduction in the design, while the other creates a larger deformation of the robot’s surface to manipulate air turbulence.
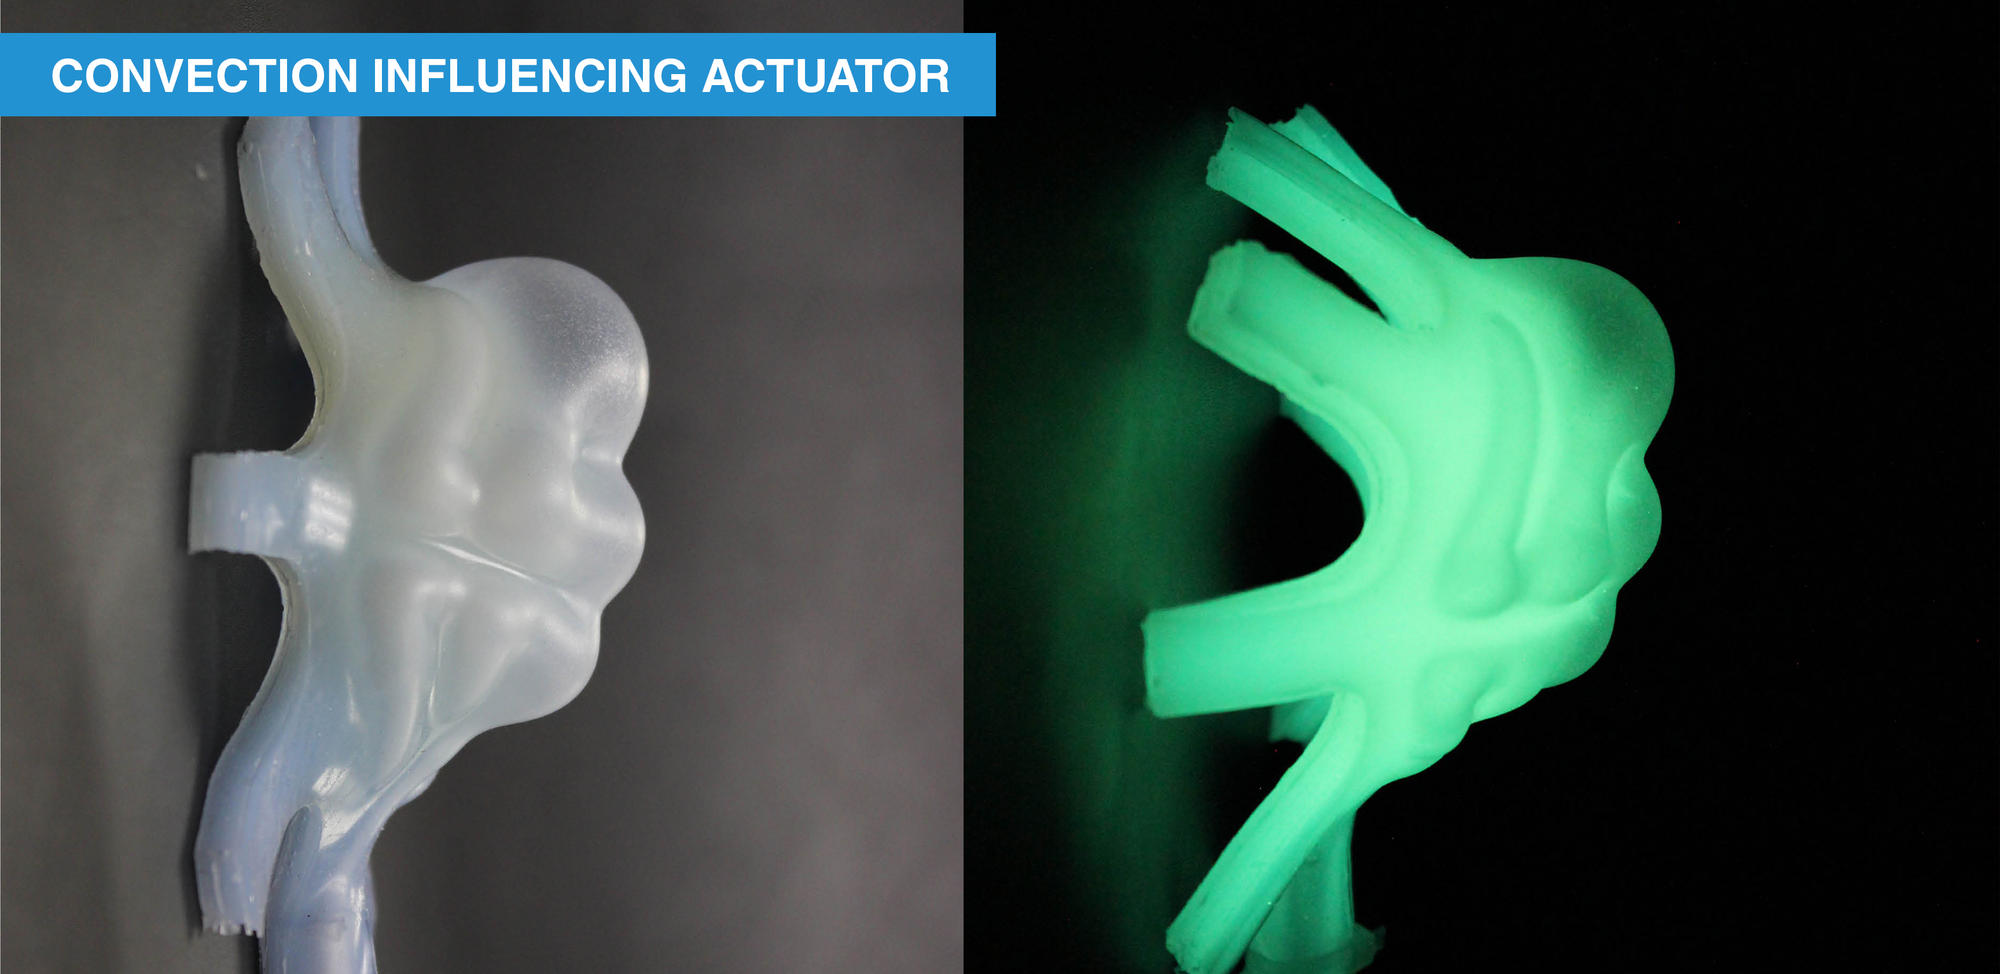
The latter actuator displays great similarities to the PneuNets actuator and uses internal air chambers to create a larger curving deformation. The former actuator uses a flat mold to create an actuator with a nonlinear movement, inflated through a series of incorporated air pockets. Just like the PneuNets actuator, Soft Barrier Robot also uses a number of layers that are adhered together. The major difference between the PneuNets actuator and the Soft Barrier Robot lies in the geometry of the air chambers and hence the final deformation. While the goal of the PneuNets actuator is used to create a bending movement, the Soft Barrier uses the air chamber to inflate without bending but with a very high degree of control over the actual air volume in the system. The design comprises of four layers of silicone. One layer is made with a sturdier silicone (Dragon Skin- 30) to stabilize the entire actuator assembly.

Materials
The initial project phase included the design, development and fabrication of soft actuator prototypes. They were instrumental in incorporating the material behaviors into the design phase. The main body of the soft robot is composed of silicone. This material is extremely versatile and can be easily cast into a large variety of shapes. Its extreme flexibility and strength is instrumental for the pneumatic actuation. Furthermore it allows incorporating thermochromic and phosphorescent pigments into a material composite.

The search for the right material was crucial to our design. Five different types of rubber silicone products from Smooth-On were tested: Ecoflex -10, Ecoflex-30, Ecoflex-50, Dragon Skin-30 and the Dragon Skin-50. The final material selection included Ecoflex-50 and Dragon Skin-30, which had the desired flexibility and strength.
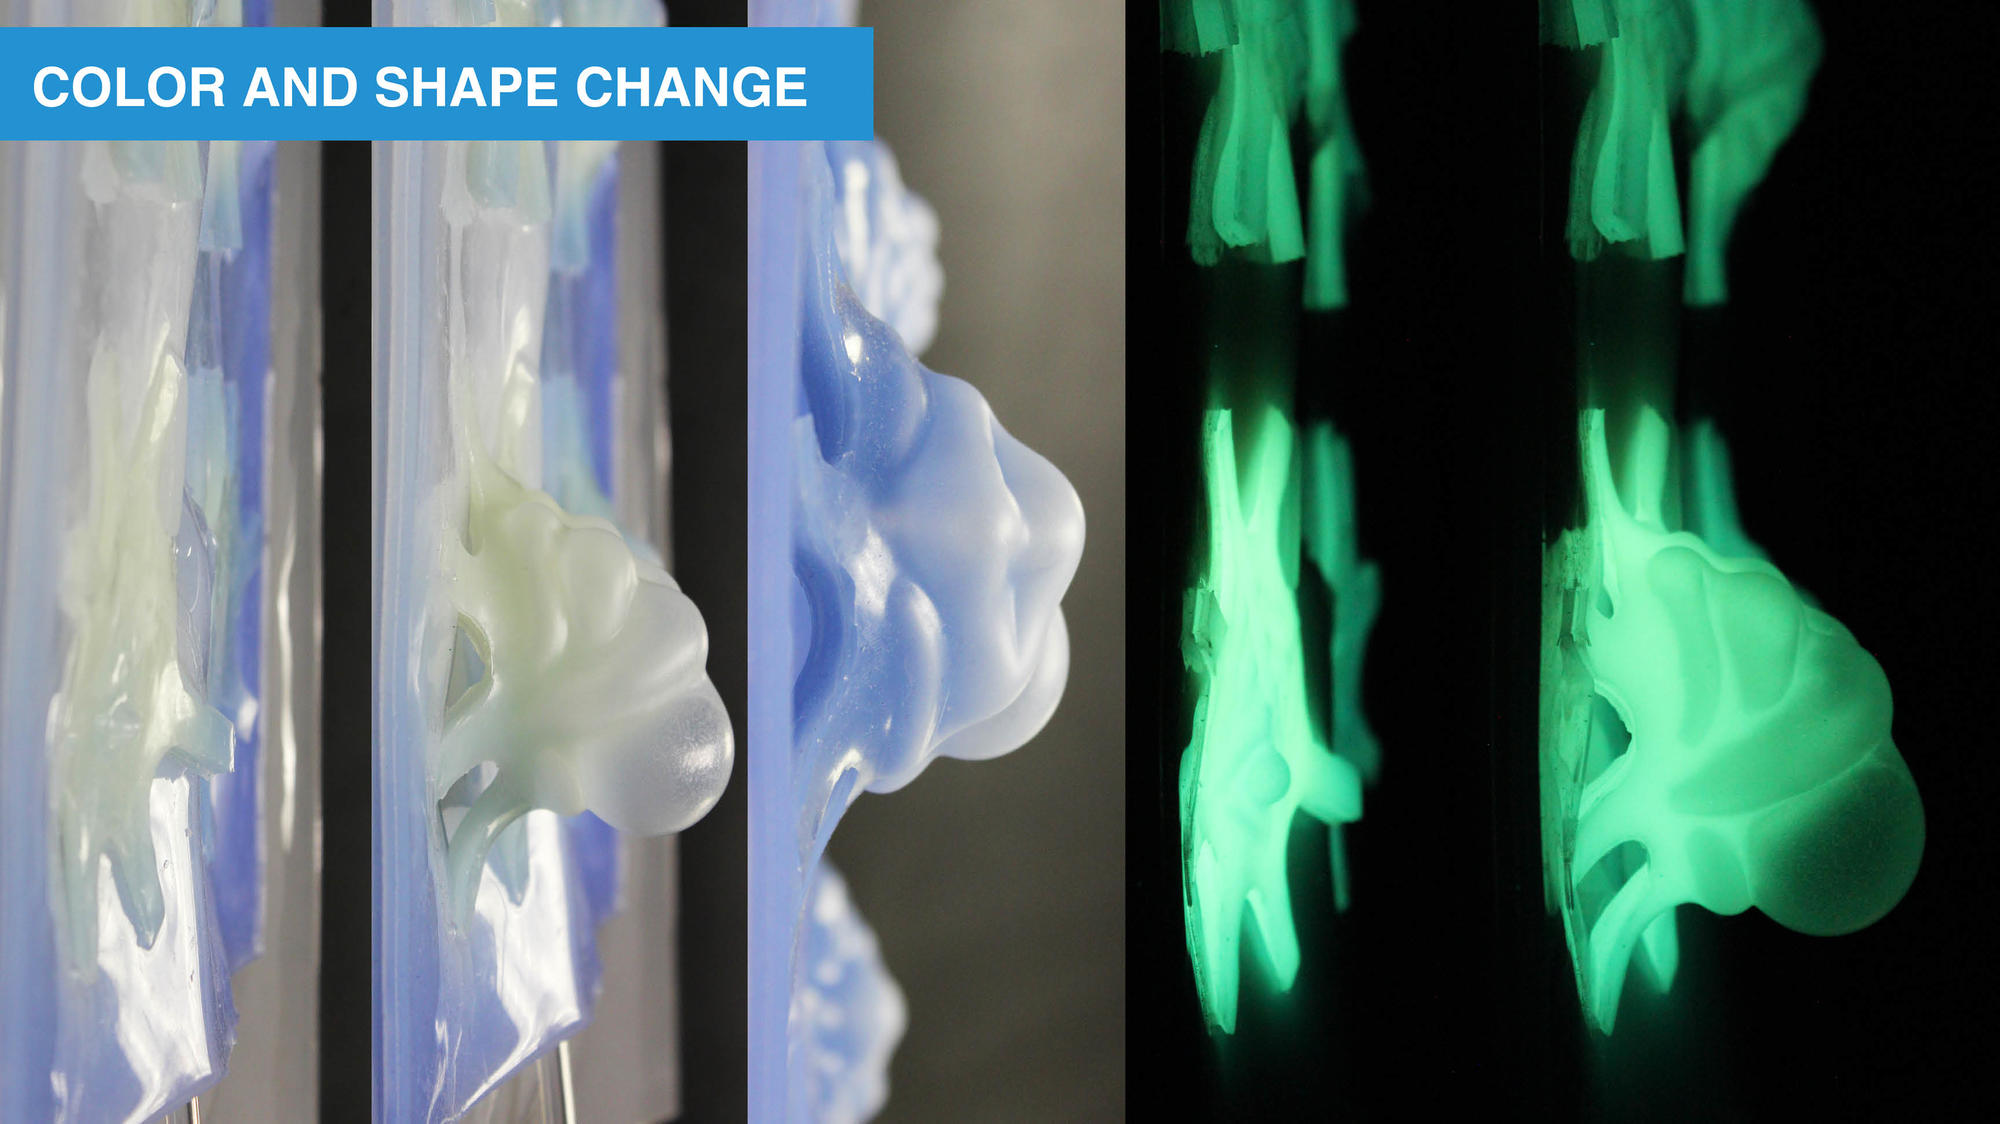
Thermochromic and phosphorescent pigments were introduced into the project. Thermochromic pigments change their color depending on the ambient temperatures present. This serves to absorb or reflect solar energy during different times of the year and different seasons. Cold winter temperatures allow the material composite to darken and absorb more solar heat gain. Hot summer temperatures allow the surface to whiten and reflect the solar heat gain back into its surroundings. The phosphorescent pigments absorb energy from the sun during the day and emit it slowly during night time. They are incorporated to remind users in darkness about the energy conservation of the system.


Manufacture

A simple geometry is used throughout the design in order to allow for an ease of fabrication and reproduction. The idea called for the creation of sandwiched silicone layers with embedded air chambers which is flexible enough to stretch and bubble up when inflated. Thickness was taken into consideration and allows for each panel to inflate with ease as well as weigh less. The thinnest layer in the Soft Barrier is 1/16” (1.5875 mm) thick with one being 1/8” (3.1750 mm) thick.
The manufacturing the prototype by hand called for extreme precision. The molds for each design were laser cut from acrylic sheets ( with varying thicknesses) and carefully assembled. During the mixing process it was important to prevent the formation of bubbles in the silicone. This was achieved by gently folding the two silicone components together with the pigments into a smooth mixture. The pouring process had to be executed in a time effective manner to prevent the early setting of the materials.
Automation

The future goal of the project would call for automation, a dynamic system that has the ability to adapt to varying conditions. The soft robots are meant to interact with each other through a series of microcontrollers and sensors. Every microcontroller would connect to a mainframe computer system to allow for overrides and changes. Temperature sensors would read the temperature fluctuation in the interior and the exterior environment to determine if pneumatic elements should be active or dormant. Pressure sensors and contact switches would activate micro diaphragm air pumps located on each panel to facilitate the necessary inflation of each robot.
References:
Fabrication

This section of the project is meant to serve as a guide to fabricating a Soft Barrier robot. As mentioned before, a Soft Barrier robot consist of two main types of actuators, divided into different layered components. The components are quickly and carefully cast at room temperature then glued together using silicone. Below is an outline to the fabrication process.

Fabrication Outline:
- Laser cut the molds from acrylic sheets. Layer and glue down the parts to assemble.
- Gently mix the Rubber silicone (part A and B) and pour it into the molds. Using a straight strip of rigid material, evenly distribute the silicone throughout the mold and slide across the top to get rid of excess silicone.
- Allow the parts to set and then demold by manually peeling them off with the help of a blade.
- Glue the actuator components with uncured silicone and wait for the glue to cure.
- Actuate and check for openings. Fill in tiny openings with uncured silicone and wait for the filler to fully cure.
Materials and Tools

Materials for the actuators include:
- Weight scale
- Measuring cups/beakers
- Spoons and stir sticks
- Brushes
- toothpicks
- Syringes
- X-Acto knife or blade
- Thermochromic Pigment- TurnThermo brand
- Phosphorescent pigment- we used a D-Tek liquid brand (http://www.dtekcustoms.com/index.aspx#.VYH9uPlViko)
- Rubber Silicone – EcoFlex- 50
- Rubber Silicone – DragonSkin-30
- Acrylic sheets that can be laser cut. (1/16" and 1/8" think)
- Superglue- We used Zap-a-Gap (http://www.supergluecorp.com/zap/zap-glues/zap-gap)
- Vaseline
- Fish tank tubing
- A Parker brand micro diaphragm air pump. - We used a 12v dc pump.
- Spray release - Smooth-On brand
- Foam core - used for mold bases
Note: Initial prototype fabrications were unsuccessful due to the use of latex gloves that caused a material reaction that prevented the silicone from curing. When using the acrylic sheets the spray release (Smooth-On) is not necessary due to the smoothness of the mold material.

Materials for the Test Chamber include:
- Plywood
- Table saw
- Insulation: 2-3 sheets of ¾ inch thick insulation
- 2 heat lamps ( one for each test chamber)
- 2 temperature data loggers
- Thermometer
- Screws and Nuts
- Screwdriver
- Acrylic frame – used for stability of the actuator
- Fish tank tubing
- Clamps- used to clamp tubing

Materials for the microcontroller setup include:
- Microcontroller – we used an Arduino Mega board
- Micro air pumps
- Temperature, light and pressure sensors
- Transistors
- Jumper wires
- Resistors
- A battery pack or power source
- A computer or laptop
Casting

Step 1. Design and Create a Mold
Design and create a mold, making sure to think about the mold as an inverse of the final product. A mold can be laser cut from acrylic sheets and glued together with a super glue (we used Zap-a-Gap).
Step 2. Prepare Everything Necessary to Pour
Once a mold is created, the tools and materials needed to mix and pour the silicone robot must be prepared before starting steps 3-5. Some silicone mixes like the Ecoflex-50 (15 mins.) will start to set quickly. Preparing all tools and materials ahead of time will allow one to properly finish the mixing and pouring stages.
Step 3. Mix The Silicone
Once the materials and tools are ready, measure and pour an equal volume or weight of part A and B of your silicone kit. The Ecoflex-50 and Dragon Skin use a 1:1 mix ratio by weight or volume. Make sure to follow the directions provided on the packaging. Different silicone kits may have different instructions on how to mix their brand of silicone. The best mixing technique is one in which the silicone is slowly and steadily mixed for a short period of time. Overmixing can cause air bubbles and popping to occur when actuated. Pigments should be incorporated during the mixture of part A and Part B.

Step 4: Pour the Silicone Into the Mold
After the silicone parts have been mixed, slowly pour the silicone into the mold. Evenly spreading the silicone with a long straight strip of rigid material will allow for an even thickness. The edge of the mold can be used to guide and get rid of any excess silicone. Allow every poured silicone component to fully set and cure before peeling. Curing times may vary on the brand and type of rubber silicone being used.

Step 5: Peel and Assemble
Carefully use an X-Acto knife or blade to peel off an edge from each mold. Manually peel the rest of the silicone from the mold. Be careful not to pull too hard as it might tear thin areas. Trim excess pieces of silicone and set aside each component for assembly. Use the Ecoflex-50 and a syringe to assemble and glue down the components. Gently press down on each glued down layer to get rid of air bubbles created in between. To prevent silicone layers from sticking together, Vaseline may be lightly spread where air chambers are located. Make sure to not spread any Vaseline were silicone will be used as an adhesive. The silicone may not cure properly.
Allow for your soft robot to fully cure before actuating. Silicone used to glue components together may take longer to set and cure.

.
Testing

The testing phase was comprised of five tests, each measuring the amount of heat transfer in both the Soft Barrier's active and dormant states. Temperature data loggers organized the final data into ten second intervals. The data was then projected onto a graph.
These initial tests were flawed and must be conducted again. The temperature difference between the two test chambers was minuscule. Temperatures within the inflated Soft Barrier test chamber rose higher when compared to those of the deflated test chamber, but both temperatures dropped at an almost similar pace.

These defective first tests may be the result of faulty and volatile heat lamps. More tests need to be performed with equal environments and better heating equipment. Heating pads may be used for future tests.
Although the initial tests did not work, it was pleasant to see that the integrated thermochromic pigments responded well to the temperature differences.
Project Weaknesses:
- Long term test were not conducted, but must be done to understand how the Soft Barrier will react in exterior conditions such as wind, rain and intense sunlight.
- The embedded thermochromic pigment was introduced to the design with a full knowledge of its weakness and strength. Its weakness is the inability to withstand long term exposure to UV light, but research and improvement on the product is currently being conducted.
- Other weaknesses the Soft Barrier may have include the design and materials being used. The possibility of testing the same design in other materials or forms of rubber silicone may help protect the Soft Barrier from exposure to long term damages, especially popping.
- A further design of the Soft Barrier robot will also have to address weak spots found in the design section. The next prototype will require a greater overlap of the air pockets.