Step 2: Molding: Making the Main Body
Making the Main Material
The material used was Polydimethylsiloxane (PDMS). We used the product Econ® 80 (80A Urethane Rubber Compund) from company Smooth-On Inc.


There are two liquid parts A and B. First, we stirred each part thoroughly with a stick.

After each part was sired, we mixed A and B in a 1:1 ratio by volume. It is okay to mix with a stick as long as it is mixed thoroughly. After the mixing, we could see air bubbles inside the material. The next step was vacuum-degassing to get rid of the air bubbles.

To minimze air bubbles in cured rubber, it is important to do vacuum degassing. Before we used the conditioning mixer, we first measured the weight of the material, the cup that contained the material, and the container used for the mixer.


We used a conditioning mixer called AR-100. Since the weight was 94.8g, we adjusted the weight condition accordingly, and de-foamed it.
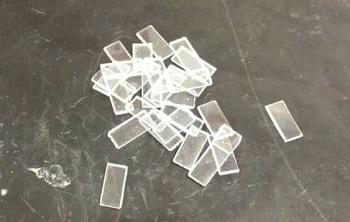
Laser Cutting the Braces
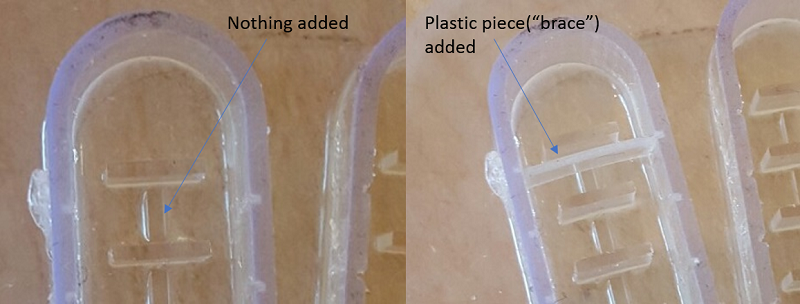
In order to enable the fingers to be bent easily, small cracks should be made in the fingers. For this, small rectangular pieces (which we called "braces") were put within the finger parts of the mold.
| 
|
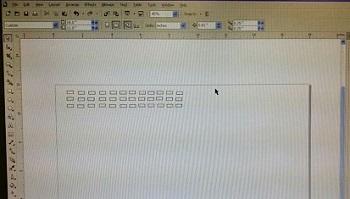
Using CoreIDRAW X5, we drew 0.44' x 0.20' rectangles and sent them to the Epilog Laser Mini.
The Laser Mini was used to cut 2mm thick Poly (methyl methacrylate) (PMMA).
|

|
After de-foaming, slowly pour the material in the mold.

Cure overnight (at least 24 hours) at room temperature (73°F/23°C) and then demold.
After the mold hardens, add the laser cut braces on each finger.
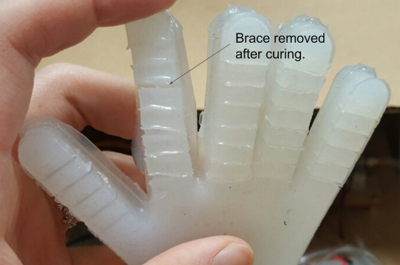
Remove the braces after the polydimethylsiloxane has been cured.