Design
Gummy Bear Actuators
1. Inflating Worms Experiment - Proof of Concept
We first asked if gummy candies on the market were both stiff enough to withstand high pressures to inflate and elastic enough to return to its original shape after actuation. To test this, we bought gummy worms from a local grocery store. We used a Wilton brand Cookie Flooding etching tool to bore a hole through the gummy worm. We ran into an issue when the gummy worm would meld back together as soon as the etching tool was removed. To counteract the self healing properties of the gummy, we covered our etching tool in flour to dry out the inside of the worm. We then attached a syringe and successfully inflated and deflated the worm. After this experiment, we were confident that gummy candy can be used for soft robotic actuation.
Figure 3 and 4: Tool and Gummy Worm on Syringe | |

| 
|
The image above on the left is the tool which we used to poke a holes into the gummy worms as well as to help us carefully remove melted gummy bears from the actuator mold. The image above on the right is an image of a gummy worm on a syringe. | |
Figure 5-7: Inflation of Gummy Worm |

|
The figures above show an inflation cycle of a gummy worm |
2. Recasting of gummy candy
Once we determined that gummy candies could be inflated, we asked if we could melt down gummy bears to re-shape them as actuators. To start, we melted gummy bears in glass beakers on a hot plate heated to 200deg C. We used candy molds to cast melted bears as worms.
Figure 8: Sequence of Bears to Worms |

|
The figure above shows the process of melting gummy bears, pouring the solution into the mold, then cooling to make gummy worms. |
3. Molding candy actuators.
We then followed this procedure to cast gummy bears as actuators. Using a 3D-printed mold, we created a pneunet actuator. We immediately ran into two issues: the high viscosity of the solution made it difficult to pour - and, after curing, the candies adhered to the mold, breaking the molds upon removal.
Figure 9-10: Gummy Actuators |

|
The figures above show the first molds to be filled with melted gummy bears.
To remedy these two issues, we began using a 60ml syringe to fill the molds and started spraying the molds with Pam cooking spray. Using a syringe allowed for a smoother and more even flow of the gummy candy. Adding the Pam cooking spray allowed for the gummy to be molded but not adhere to the mold allowing us to remove the gummy in one piece.
Figures 11-17: |

|

|
The images above show the process of melting, pouring, and assembling the candy actuators. In the second picture the green gummy is the bottom layer and the yellow gummy is the top layer. They are eventually glued together to create the whole gummy actuator.
We did a series of compression and qualitative testing on the gummy bears which can be seen on the Testing page. We noticed that it took around three days for the melted gummy bears to rebond the broken gelatin long chain structure and return to having similar properties to that of the gummy bears directly out of the package. Upon adding desiccant we noticed a drop from three days to a single day which allowed for a quicker production of actuators.
Initially when we were tasked with attaching the base of the actuator to the air cavities we simply melted gummy bears and used that as a form of glue. This process was tedious as the "glue" could get into and clog some of the air pockets and took quite a bit of time to dry. Addressing this issue, we switched to water. We wet the base of the actuator and stuck the top part of it directly on. the water bonded the two halves together and was a better gluing agent for the gummy bear actuators.
The Fordmula
4. Identifying Issues
We were excited with the results of our gummy bear actuator, but we saw some areas to improve. To put it simply, the gummy bear solution did not perform at the high level required for quick and easy production as well as rigorous actuation. The solution had low elasticity and would not come back to its original shape very quickly. When actuated, it would remain stretched out for long periods of time. Another issue was the long curing process to make each actuator. Once the gummy bears were poured into the mold, we had to wait days before they became semi-stale and had any elasticity. This process was made even longer when you factor in the waiting period of attaching the bottom layer to the top layer - a long wetting and melting process.
With our own "Fordmulation," we aimed to increase elasticity - and decrease production time. We set out to make our own optimized formulation — The Fordmula.
Looking at the common ingredients of candies resembling our desired properties (Gummy Bears, Laffy Taffy and Jello), we designed an experiment which would help determine the ideal formulation. The four key ingredients were gelatin, corn syrup, water and flavoring. According to our detailed qualitative analysis the flavoring and the sugar had a negligible effect on the actuators. The qualitative analysis included cutting the gummy material with a knife to mimic our teeth and stretching the gummy material to look at how easy or hard it was to stretch (malleability) and its elasticity. After we had narrowed down possible ratios, from qualitative analysis, we added the flavoring back into our tests to get a more accurate result.
We first tested the ratio of solvent to solute. The solvent (equal parts corn syrup and water) was mixed in a 1:1 ratio to form a well mixed solution. To that we added a constant amount of gelatin to varying volumes of the water and corn syrup solution. These solutions were then heated up to 150° Celsius to concentrate the solution by evaporating the water.
Figure 18 and 19: Solvent to Solute Ratios | |

| 
|
The figures above show the creation of different samples. | |
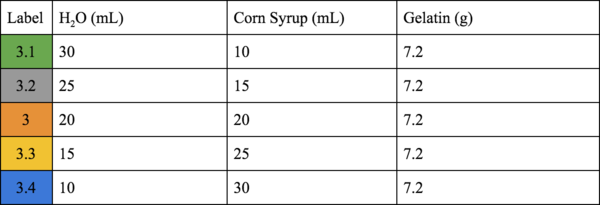
Table One: Tested Ratios of Solvent to Solute |

|
This table shows the different types of solvent to solute ratios and the qualitative analysis of each tested solution. Solution 1 to 4 varied from 0.36g gelatin/mL liquid to 0.12g gelatin/mL liquid. |
Figure 20: Mechanical Testing System Data on Solvent to Solute Ratios |

|
Figure 20 displays the graph of Strain vs. Stress for Solvent to Solute calculated by MTS Testing.
We used an MTS to analyze which ratios would have the most ideal properties to perform rigorous actuation. Solution One was not tested as its globby and uneven properties proved it to be un-testable. Solution Two was the most stiff but was much too viscous to properly pour into the mold. Solution Four was the least elastic. Solution Three appeared to have the optimal viscosity and elasticity and was chosen as our path forward. Upon having the optimal solvent to solute ratio we could now test the different ratio of solvents.
Using Solution Three at a ratio of 0.18g gelatin/mL, next we varied the ratio of corn syrup to water to optimize the formulation further. The control was the one to one (Corn Syrup to Water) ratio previously tested. Four additional solutions of varying solvent ratios were prepared.
Table Two: Tested Ratios of Corn Syrup to Water |
|
This table shows the different solvent to solvent ratios. |
Upon visual observation, the mixtures appeared to have varying degrees of clarity. With increasing dilution of the corn syrup, the solutions became clearer and less viscous.
Figure 21: MTS Data on Solvent to Solvent Ratios |
Figure 21 displays the graph of Strain vs. Stress for Solvent to Solvent calculated by MTS Testing. |
Solution 3.2 was chosen for several reasons. First, it had the steepest strain vs. stress curve which proved to produce the stiffest material able to withstand actuation pressures. This is important for actuation so we know the actuator will quickly come back to its original shape and perform many actuations. The solution was also clear, a visually appealing candy, in contrast to the more murky solutions with higher corn syrup concentrations. Lastly, the solution wasn't too stiff that it would be impossible to chew. It has a great balance of easy tearing contrasted with high tensile strength and elasticity.
We also filed a provisional patent on the Fordmula. We are all co-inventors on the provisional patent, US Patent Application Number 62/517,299, entitled “EDIBLE PNEUMATIC SOFT ROBOTIC ACTUATORS”, filed on June 9, 2017 by the Haverford School.
Some areas of future enhancement are descrbed here
Figure 22: 3.2 Actuator |

|
Figure 22 displays the candy actuator using the Fordmula. |