Fabrication
There are many different methods of fabricating McKibben actuators, depending on the desired specifications and intended application. However, the general fabrication process is as follows:
- Get inner tubing (can be off-the-shelf or custom-molded) and cut to length
- Cut mesh to length and seal one end
- Optional: Modify end braid angles (helps prevent ends from fraying)
- Pull mesh over inner tubing
- Add air line and seal/clamp
- Optional: Coat actuator with outer layer of elastomer (for faster deflation)
Example Fabrication
The actuator made in the below guide can be made in under 10 minutes using entirely off-the-shelf parts. Though this is one specific fabrication process, it demonstrates the more general process outlined above.
Materials
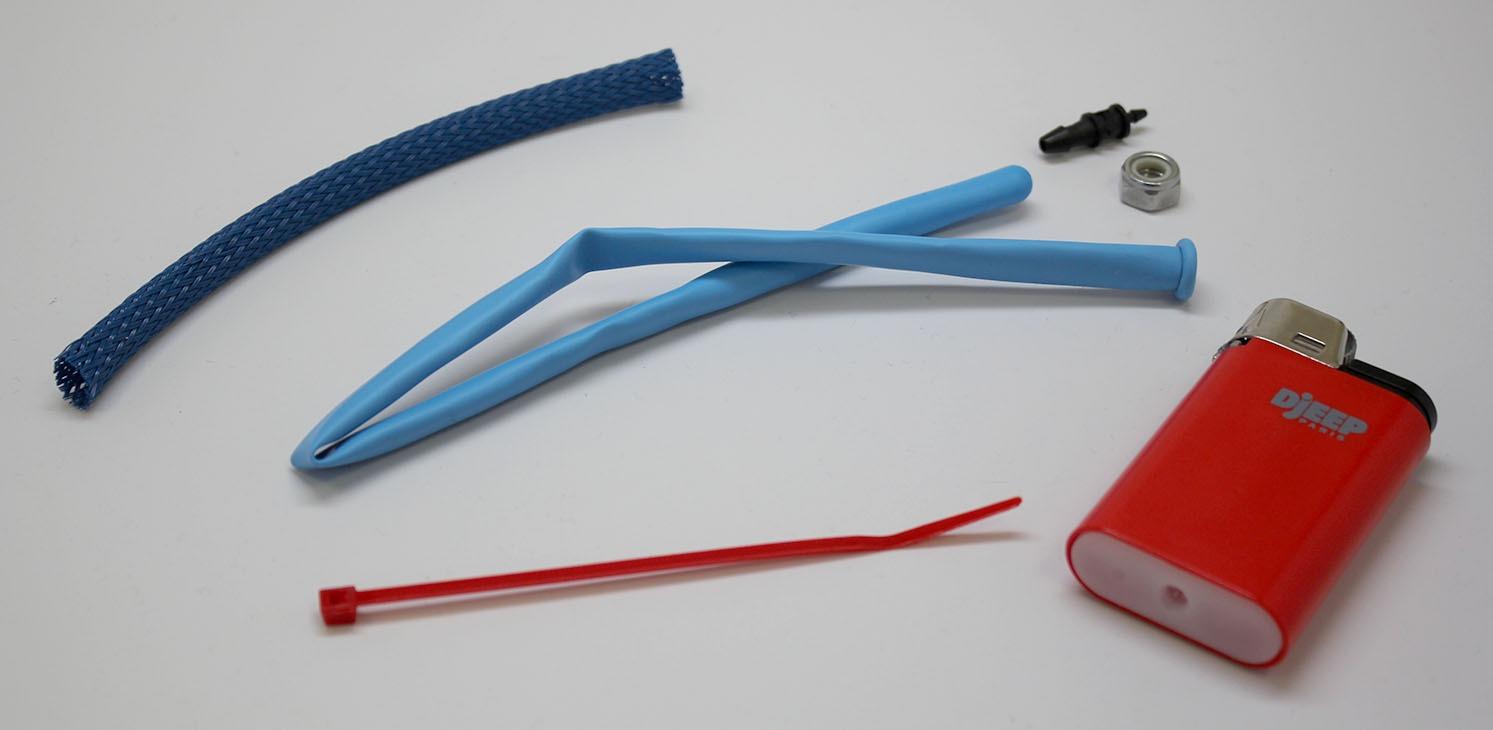
- Party balloon (long thin kind used for making balloon animals)
- This will be used for the inner bladder, other types of elastic tubing would work also
- Braided mesh sleeving
- Barbed connector (use one that fits your pressurized air source for easy attachment later)
- Zip tie
- Lighter
- Nut, washer, or similar tool with a hole diameter smaller than the braided mesh
Assembly

Cut a piece of mesh 4-5 inches long. Cut a piece of party balloon about the same size.

Gather the strands of one end of the mesh and hold them together with a tool, leaving 3-4 mm sticking out the end. Several tools can be used, i.e. pliers, a metal fixture, etc. Here we use a nut.

Hold a flame very close until the strands melt and fuse into one clump.

Remove the nut. The end should not fray even when the mesh is compressed.

Put the balloon in the mesh. Insert the balloon 1-2 cm without fraying the mesh too much, then use the following “inchworming” process [Video]:
- With your right hand, pinch the balloon + open end of the mesh, and with your left, pinch the mesh a few cm in front of the balloon tip.
- Bring your fingers together, until your left hand is almost touching the balloon. The mesh will expand radially.
- Scoot your left pinch forward so that you are pinching the front tip of the balloon.
- Release your other hand. The mesh will slide backwards over the rest of the balloon.
- Repeat steps 1-4 until the balloon is all the way in the mesh.

Trim away any frayed mesh and trim the balloon to match the mesh length.

Insert the barbed connector, with the larger end going into the balloon.
Use the zip-tie to secure the mesh and balloon onto the barbed connector, clamping onto the narrow section immediately after the barb.

Actuation

Trim the excess zip tie ends, then connect the actuator to a pressurized air source like a hand pump or wall valve.

Pressurize the actuator. It should contract about 25% of its original length. Be careful not to over-inflate as it may pop.

If your actuator leaks, you can re-do the zip-tie clamping after adding some padding around the barbed connector, or use thread wrapping instead of the zip-tie.
Bibliography
Obiajulu et al. (2013) Soft Pneumatic Artificial Muscles With Low Threshold Pressures for a Cardiac Compression Device.
Roche et al. (2014) A Bioinspired Soft Actuated Material.
Chou & Hannaford. (1996) Measurement and modeling of McKibben pneumatic artificial muscles.
Doumit et al. (2009) Analytical Modeling and Experimental Validation of the Braided Pneumatic Muscle.
Tondu et al. (2012) Modelling of the McKibben artificial muscle: A review.
Contributors
Ellen Roche