Step 3: Assemble Actuator
Remove main body from molds
Using a flathead screwdriver, pry one end of the molds apart, then work your way around each side. Be careful not to pierce the actuator with the screwdriver. Next, use the tabs on the sides of the molds to pull the mold pieces apart. It is okay to pull very hard, as this material is hyperelastic and can stretch quite significantly before tearing.
The mold will probably deform during this process; that is not a problem. It can be fixed by placing the empty mold back in the oven for about 10 minutes so the plastic softens, and then taking it out and putting it on a flat surface with a weight on top of it.
Join main body and base
Examine the bottom of the main body/chamber piece. It should look something like this:
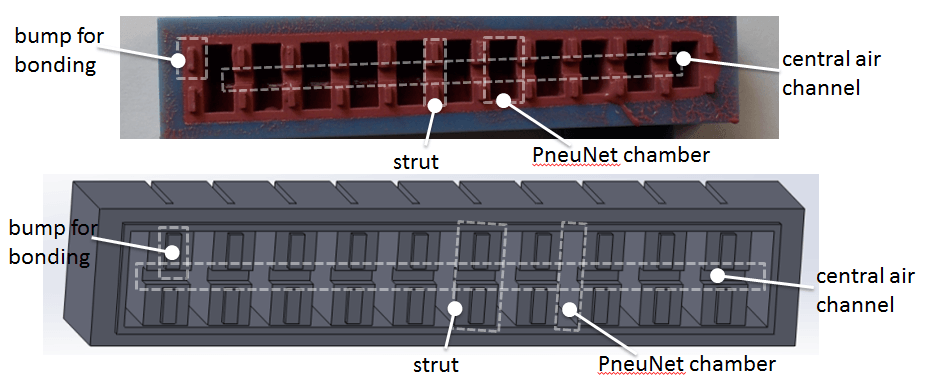
In addition to each of the chambers, there is a shallow groove running down the long axis of the actuator. This is the channel that supplies air to each the chambers. It is important not to block this channel when gluing the two parts of the actuator together, otherwise the chambers will be cut off from the air supply and the actuator will not function.
At the same time, however, the bond between the top and bottom pieces of the actuator needs to be complete so that the chambers do not leak. This means that the edges and struts of the actuator all need to be slightly submerged into the base piece before curing. The little bumps sticking out of the bottom of the top piece should be embedded into the base piece as well, further helping bonding.

Remove the base from the oven and fill the remaining half of the base mold so that the Elastosil is almost at the brim. As the Elastosil in the cup may have started curing by this point so that it is no longer pourable, you can use a spatula or other tool to scoop and spread it into the mold. If the material in the cup has become too viscous, make a fresh mixture. You will only need about 10g.
Place the top piece of the actuator on the base so that it settles into the uncured Elastosil, and press down gently. If you press too hard, the central channel of the actuator may become blocked. Make sure to press down around the edges as well to ensure a good seal.
Place the joined parts back into the oven to cure for 5-10 minutes.
Inspect

Remove the cured actuator from the oven, and peel it from the mold. Look it over and make sure there are no holes or thin spots. If necessary, patch with extra material and cure again.
Bibliography
Ilievski et al. (2011) Soft robotics for chemists.
Mosadegh et al. (2013) Pneumatic Networks for Soft Robotics that Actuate Rapidly.
Ogura et al. (2009) Micro pneumatic curling actuator: Nematode actuator.
Polygerinos et al. (2013) Towards a soft pneumatic glove for hand rehabilitation.
Shepherd et al. (2011) Multigait soft robot.
Sun et al. (2013) Characterization of silicone rubber based soft pneumatic actuators.
Contributors
Panagiotis Polygerinos
Bobak Mosadegh
Alexandre Campo